How to load a DictionaryStyle.xaml file at run time?

Changing a theme or style at run-time is possible by assigning styles using DynamicResource binding and loading a ResourceDictionary (XAML) from a Content file at run-time.

This can be done by loading a DictionaryStyle.xaml at run time.

If you would prefer to just jump right in, download the source code: RuntimeLoadOfResourceDictionaryExample.zip

Step 1 – Create a new WPF Application project in Visual Studio

  1. In Visual Studio, go to File | New | Project.
  2. Select WPF Application.
  3. Provide a name for the project and make sure the path is correct.
  4. Click OK.

Step 2 – Create a basic WPF User Interface

  1. Create a basic interface.
    Note 1: You can make one yourself, or you can use the basic interface I used. Just copy and paste from below.
    Note 2: I have already added a menu for selecting the Blue or Grey for you.
  2. Set the Style to use DynamicResource binding.
  3. <Window x:Class="RuntimeLoadOfResourceDictionaryExample.MainWindow"
            xmlns="http://schemas.microsoft.com/winfx/2006/xaml/presentation"
            xmlns:x="http://schemas.microsoft.com/winfx/2006/xaml"
            Title="MainWindow"
            Style="{DynamicResource ResourceKey=MainWindowStyle}"
            >
        <Grid>
            <Grid.RowDefinitions>
                <RowDefinition Height="Auto" />
                <RowDefinition Height="30" />
                <RowDefinition Height="Auto" />
                <RowDefinition Height="Auto" />
                <RowDefinition Height="Auto" />
                <RowDefinition Height="Auto" />
                <RowDefinition Height="25" />
            </Grid.RowDefinitions>
            <Grid.ColumnDefinitions>
                <ColumnDefinition Width="15" />
                <ColumnDefinition Width="*" MinWidth="100"/>
                <ColumnDefinition Width="*" MinWidth="200"/>
                <ColumnDefinition Width="15" />
            </Grid.ColumnDefinitions>
            <DockPanel Grid.ColumnSpan="4" >
                <Menu DockPanel.Dock="Top" >
                    <MenuItem Header="_File">
                        <MenuItem Header="E_xit" Click="MenuItem_Exit_Click" />
                    </MenuItem>
                    <MenuItem Header="_Styles">
                        <MenuItem Name="BlueStyle" Header="_Blue" Click="MenuItem_Style_Click" />
                        <MenuItem Name="GreyStyle" Header="_Grey" Click="MenuItem_Style_Click" />
                    </MenuItem>
                </Menu>
            </DockPanel>
            <Label Content="First Name" Name="label1" Grid.Row="2" FlowDirection="RightToLeft" Grid.Column="1" />
            <Label Content="Age" Name="label3" Grid.Row="3" FlowDirection="RightToLeft" Grid.Column="1" />
            <Label Content="Last Name" Name="label2" Grid.Row="4" FlowDirection="RightToLeft" Grid.Column="1" />
            <TextBox Name="textBox1" Grid.Column="2" Grid.Row="2" />
            <TextBox Name="textBox2" Grid.Column="2" Grid.Row="3" />
            <TextBox Name="textBox3" Grid.Column="2" Grid.Row="4" />
            <Button Content="Clear" Grid.Column="2" Grid.Row="5" Height="23" HorizontalAlignment="Right" Name="button1" VerticalAlignment="Top" Width="75" />
        </Grid>
    </Window>
    
  4. Also populate the MainWindow.xaml.cs file with the code-behind needed for some of the events.
            private void MenuItem_Exit_Click(object sender, RoutedEventArgs e)
            {
                Environment.Exit(0);
            }
    
            private void MenuItem_Style_Click(object sender, RoutedEventArgs e)
            {
                MenuItem mi = sender as MenuItem;
                string stylefile = Path.Combine(App.Directory, "Styles", mi.Name + ".xaml");
                App.Instance.LoadStyleDictionaryFromFile(stylefile);
            }
    
  5. It won’t compile just yet as some of the code doesn’t exist yet.

Step 3 – Add code to read in a ResourceDictionary at runtime

This is going to take place in the App.xaml.cs file. App.xaml.cs is the ultimate parent and by loading the ResourceDictionary here, every child will have access to them. This especially becomes important with larger projects where WPF UI elements, controls, windows, or others may come from other dlls.

  1. Open the App.xam.cs file as shown below.
  2. Add a function to load the ResourceDictionary at runtime.
  3. Now add some member variables and create a constructor that loads a style by default.Your class should now look as follows:
    using System;
    using System.IO;
    using System.Windows;
    using System.Windows.Markup;
    
    namespace RuntimeLoadOfResourceDictionaryExample
    {
        /// <summary>
        /// Interaction logic for App.xaml
        /// </summary>
        public partial class App : Application
        {
            public static App Instance;
            public static String Directory;
            private String _DefaultStyle = "BlueStyle.xaml";
    
            public App()
            {
                Instance = this;
                Directory = System.IO.Path.GetDirectoryName(System.Reflection.Assembly.GetExecutingAssembly().Location);
                string stringsFile = Path.Combine(Directory, "Styles", _DefaultStyle);
                LoadStyleDictionaryFromFile(stringsFile);
            }
    
            /// <summary>
            /// This funtion loads a ResourceDictionary from a file at runtime
            /// </summary>
            public void LoadStyleDictionaryFromFile(string inFileName)
            {
                if (File.Exists(inFileName))
                {
                    try
                    {
                        using (var fs = new FileStream(inFileName, FileMode.Open, FileAccess.Read, FileShare.Read))
                        {
                            // Read in ResourceDictionary File
                            var dic = (ResourceDictionary)XamlReader.Load(fs);
                            // Clear any previous dictionaries loaded
                            Resources.MergedDictionaries.Clear();
                            // Add in newly loaded Resource Dictionary
                            Resources.MergedDictionaries.Add(dic);
                        }
                    }
                    catch
                    {
                    }
                }
            }
        }
    }
    

Now, we haven’t create the default style yet, don’t fret, that is the next step.

Step 4 – Create Some Styles

  1. In Visual Studio, add a new folder to your project called Styles.
  2. Right-click on the folder and choose Properties.
  3. Set the Namespace Provider value to false.
  4. Right-click on the Styles folder and choose Add | Resource Dictionary.
  5. Provide a file name and make sure that Resource Dictionary (WPF) is selected.
    Note: I named my first resource dictionary BlueStyle.xaml.
  6. Click Add.
  7. Right-click on the BlueStyle.xaml file and choose Properties.
  8. Set ‘Build Action’ to ‘Content’.
  9. Set ‘Copy to Output Directory’ to be ‘Copy if newer’.
  10. Set ‘Custom Tool’ to blank.
  11. Populate the BlueStyle.xaml with your desired style. Here is the simple style I used for this example.
    <ResourceDictionary xmlns="http://schemas.microsoft.com/winfx/2006/xaml/presentation"
                        xmlns:x="http://schemas.microsoft.com/winfx/2006/xaml">
        <Style x:Key="MainWindowStyle" TargetType="Window">
            <Setter Property="SizeToContent" Value="WidthAndHeight" />
            <Setter Property="Background" Value="RoyalBlue" />
        </Style>
        <Style TargetType="Label">
            <Setter Property="Margin" Value="0,5,0,5" />
        </Style>
        <Style TargetType="TextBox">
            <Setter Property="Margin" Value="0,5,0,5" />
        </Style>
    </ResourceDictionary>
    
  12. Create a copy of the style named GreyStyle.xaml.
  13. Repeat steps 7 thru 10 for this new file.
  14. In the GreyStyle.xaml, change the Background of the MainWindowStyle to DarkGrey.

Step 5 – Build and test

Your project should now be working.  You should be able to build and run it.  You should be able to click on Styles and change the style.
Using relative path images included as content with WPF

Many people want to include an image but for reasons such as the ability to change branding, the image should not be compiled in.

Step 1 – Create a new WPF Application project

For most, you don’t need steps to create a project, but just in case you are creating a WPF project for the first time, here are the steps.

  1. Open Visual Studio and go to File | New | Project.
  2. Select WPF Application.
  3. Provide a name and location.
  4. Click OK.

Step 2 – Add an image as Content to the project

Were are going to create a folder called images and put the image there.

  1. Right-click on the project and choose Add | New Folder.
  2. Name the folder Images.
  3. Right-click on the Images folder and choose Add | Existing Item.
  4. Choose an image from your file system and click Add. Note: I used the sword.png image from my blog for this example.
  5. Right-click on your image file and choose Properties.
  6. Change the Build Action to Content.
  7. Change the Copy to Output Directory to Copy of Newer.

Step 3 – Add the image to XAML using a relative path URI

  1. Change the Window to size to content and added a MinWidth and MinHeight as shown on lines 5 and 6. Note: This step wasn’t required, but I did it.
  2. Add an image to the MainWindow.xaml as shown on line 8.
    <Window x:Class="RelativePathImages.MainWindow"
            xmlns="http://schemas.microsoft.com/winfx/2006/xaml/presentation"
            xmlns:x="http://schemas.microsoft.com/winfx/2006/xaml"
            Title="MainWindow" 
            SizeToContent="WidthAndHeight"
            MinHeight="200" MinWidth="300">
        <Grid>
            <Image />
        </Grid>
    </Window>
    
  3. Configure the Source of the image to be the relative path using a Pack URI. See this article on MSDN for more information on Pack URIs: Pack URIs in WPF
        <Grid>
            <Image Source="pack://siteoforigin:,,,/Images/Sword.png" MaxWidth="1024"/>
        </Grid>
    

    Note: I also added a MaxWidth to the image because the resolution was huge.

  4. Build and run your project.

Your image is now loaded from whatever image is located in the relative path from your executable. Note: Another option for doing this includes using a ViewModel and binding.

How use access modifiers (internal, private, public) in XAML with WPF

You can configure the access modifier of objects defined in XAML using x:FieldModifier.

<TextBox Name="MyInternalTextBox" x:FieldModifier="internal" />
<TextBox Name="MyPrivateTextBox" x:FieldModifier="private" />
<TextBox Name="MyPrivateTextBox" x:FieldModifier="protected" />
<TextBox Name="MyPublicTextBox" x:FieldModifier="public" />

A snippet for Properties in a ViewModel

If you are using MVVM you probably should create a snippet very similar to the following to save time.

C:\Program Files (x86)\Microsoft Visual Studio 10.0\VC#\Snippets\1033\Visual C#\propvm.snippet

<?xml version="1.0" encoding="utf-8" ?>
<CodeSnippets  xmlns="http://schemas.microsoft.com/VisualStudio/2005/CodeSnippet">
	<CodeSnippet Format="1.0.0">
		<Header>
			<Title>propvm</Title>
			<Shortcut>propvm</Shortcut>
			<Description>Code snippet for property and backing field for a ViewModel that calls NotifyPropertyChanged.</Description>
			<Author>Jared Barneck</Author>
			<SnippetTypes>
				<SnippetType>Expansion</SnippetType>
			</SnippetTypes>
		</Header>
		<Snippet>
			<Declarations>
				<Literal>
					<ID>type</ID>
					<ToolTip>Property type</ToolTip>
					<Default>int</Default>
				</Literal>
				<Literal>
					<ID>property</ID>
					<ToolTip>Property name</ToolTip>
					<Default>MyProperty</Default>
				</Literal>
			</Declarations>
			<Code Language="csharp"><![CDATA[public $type$ $property$
	{
		get { return _$property$;}
		set 
		{ 
			_$property$ = value;
			NotifyPropertyChanged("$property$");
		}
	} private $type$ _$property$;
	$end$]]>
			</Code>
		</Snippet>
	</CodeSnippet>
</CodeSnippets>

WPF Binding to a property of a static class

Binding to a property of a static class is quite straight forward.

The binding string looks like this:

{x:Static s:MyStaticClass.StaticValue2}

For an example do this:

  1. Create a new folder in your project called Statics.
  2. Add the following class to the Statics folder.
    using System;
    
    namespace BindingToStaticClassExample.Statics
    {
        public static class MyStaticClass
        {
            static MyStaticClass()
            {
                Title = "Binding to properties of Static Classes";
                StaticValue1 = "Test 1";
                StaticValue2 = "Test 2";
                StaticValue3 = "Test 3";
            }
    
            public static String Title { get; set; }
            public static String StaticValue1 { get; set; }
            public static String StaticValue2 { get; set; }
            public static String StaticValue3 { get; set; }
        }
    }
    
  3. Add a reference to the BindingToStaticClassExample.Statics namespace. (See line 4.)
  4. Bind the title to the Title string value of MyStaticClass.
  5. Change the <Grid> to a <StackPanel> (not required just for ease of this example).
  6. Add TextBox elements and bind them to the two string values in MyStaticClass object.
    <Window x:Class="BindingToStaticClassExample.MainWindow"
            xmlns="http://schemas.microsoft.com/winfx/2006/xaml/presentation"
            xmlns:x="http://schemas.microsoft.com/winfx/2006/xaml"
            xmlns:s="clr-namespace:BindingToStaticClassExample.Statics"
            Title="{x:Static s:MyStaticClass.Title}" Height="350" Width="525">
        <StackPanel>
            <TextBox Text="{x:Static s:MyStaticClass.StaticValue1}" />
            <TextBox Text="{x:Static s:MyStaticClass.StaticValue2}" />
            <!-- Not supported and won't work
            <TextBox>
                <TextBox.Text>
                    <Binding Source="{x:Static s:MyStaticClass.StaticValue3}" />
                </TextBox.Text>
            </TextBox>
            -->
        </StackPanel>
    </Window>
    

You now know how to bind to properties of a static class.

TextBox Validation – How to bind to properties of the Validation of a TextBox?

Have you ever wanted to have a TextBox that requires data or specifically formatted data and you want to enforce this validation and display this to the user.

Well, I figured this out, with a great deal of pain, but hey, it works.

You can download this project in it’s entirety here:

WpfTextBoxValidation.zip

I started with a new WPF Project in Visual Studio. Here is a general overview of the steps I took to make this example project happen.

MainWindow.xaml

  1. Here, create a simple form to fill out using TextBlock and TextBox pairs in a Grid.
  2. Configure the TextBox elements to use binding.
  3. Configure the TextBox elements to use the appropriate Validation. (See the validation examples we will create below.)
  4. Below the form you created in a StackPanel, add some TextBlock elements to display the Validation’s ErrorConent.
  5. Bind each TextBlock element to the TextBox in the form they pertain to.
  6. Bind the Visibility of each TextBlock to the Errors. (We will use the converter below to return Visible if there is ErrorContent and Collapsed if not.)
<Window x:Class="WpfTextBoxValidation.MainWindow"
        xmlns="http://schemas.microsoft.com/winfx/2006/xaml/presentation"
        xmlns:x="http://schemas.microsoft.com/winfx/2006/xaml"
        xmlns:local="clr-namespace:WpfTextBoxValidation"
        Title="MainWindow" Height="350" Width="525">
    <Grid Name="MainGrid">
        <Grid.Resources>
            <Style TargetType="TextBox">
                <Setter Property="MaxWidth" Value="200" />
            </Style>
        </Grid.Resources>
        <Grid.ColumnDefinitions>
            <ColumnDefinition Width="Auto" />
            <ColumnDefinition Width="Auto" MinWidth="200" />
        </Grid.ColumnDefinitions>
        <Grid.RowDefinitions>
            <RowDefinition Height="Auto" />
            <RowDefinition Height="Auto" />
            <RowDefinition Height="Auto" />
            <RowDefinition Height="Auto" />
            <RowDefinition Height="Auto" />
            <RowDefinition Height="*" />
        </Grid.RowDefinitions>

        <!-- Labels -->
        <TextBlock Text="FirstName" />
        <TextBlock Text="LastName" Grid.Row="1" />
        <TextBlock Text="Age" Grid.Row="2" />
        <TextBlock Text="Phone" Grid.Row="3" />

        <!-- TextBlocks -->
        <TextBox Name="TextBoxFirstName" Grid.Column="1">
            <TextBox.Text>
                <Binding Path="FirstName" UpdateSourceTrigger="PropertyChanged" >
                    <Binding.ValidationRules>
                        <local:TextBoxNotEmptyValidationRule x:Name="FirstNameValidation" ValidatesOnTargetUpdated="True" 
                                                             Message="You must enter a first name."/>
                    </Binding.ValidationRules>
                </Binding>
            </TextBox.Text>
        </TextBox>
        <TextBox Name="TextBoxLastName" Grid.Row="1" Grid.Column="1">
            <TextBox.Text>
                <Binding Path="LastName" UpdateSourceTrigger="PropertyChanged" >
                    <Binding.ValidationRules>
                        <local:TextBoxNotEmptyValidationRule x:Name="LastNameValidation" ValidatesOnTargetUpdated="True" 
                                                             Message="You must enter a last name."/>
                    </Binding.ValidationRules>
                </Binding>
            </TextBox.Text>
        </TextBox>
        <TextBox Name="TextBoxAge" Grid.Row="2" Grid.Column="1">
            <TextBox.Text>
                <Binding Path="Age" UpdateSourceTrigger="PropertyChanged" >
                    <Binding.ValidationRules>
                        <local:OverThirteenValidationRule x:Name="AgeValidation" ValidatesOnTargetUpdated="True"/>
                    </Binding.ValidationRules>
                </Binding>
            </TextBox.Text>
        </TextBox>
        <TextBox Name="TextBoxPhone" Grid.Row="3" Grid.Column="1">
            <TextBox.Text>
                <Binding Path="Phone" UpdateSourceTrigger="PropertyChanged" >
                    <Binding.ValidationRules>
                        <local:TextBoxNotEmptyValidationRule x:Name="PhoneValidation" ValidatesOnTargetUpdated="True" 
                                                             Message="You must enter a phone number."/>
                    </Binding.ValidationRules>
                </Binding>
            </TextBox.Text>
        </TextBox>

        <!-- Validation List -->
        <StackPanel Grid.Row="4" Grid.ColumnSpan="2">
            <StackPanel.Resources>
                <Style TargetType="TextBlock">
                    <Setter Property="Foreground" Value="Red" />
                </Style>
                <local:ErrorCollectionToVisibility x:Key="ToVisibility" />
            </StackPanel.Resources>
            <TextBlock Visibility="{Binding ElementName=TextBoxFirstName, Path=(Validation.Errors), Converter={StaticResource ToVisibility}}">
                <TextBlock.Text>
                    <MultiBinding StringFormat="FirstName - {0}">
                        <Binding ElementName="TextBoxFirstName" Path="(Validation.Errors)[0].ErrorContent"/>
                    </MultiBinding>
                </TextBlock.Text>
            </TextBlock>
            <TextBlock Visibility="{Binding ElementName=TextBoxLastName, Path=(Validation.Errors), Converter={StaticResource ToVisibility}}">>
                <TextBlock.Text>
                    <MultiBinding StringFormat="LastName - {0}">
                        <Binding ElementName="TextBoxLastName" Path="(Validation.Errors)[0].ErrorContent"/>
                    </MultiBinding>
                </TextBlock.Text>
            </TextBlock>
            <TextBlock Visibility="{Binding ElementName=TextBoxAge, Path=(Validation.Errors), Converter={StaticResource ToVisibility}}">>
                <TextBlock.Text>
                    <MultiBinding StringFormat="Age - {0}">
                        <Binding ElementName="TextBoxAge" Path="(Validation.Errors)[0].ErrorContent"/>
                    </MultiBinding>
                </TextBlock.Text>
            </TextBlock>
            <TextBlock Visibility="{Binding ElementName=TextBoxPhone, Path=(Validation.Errors), Converter={StaticResource ToVisibility}}">>
                <TextBlock.Text>
                    <MultiBinding StringFormat="Phone - {0}">
                        <Binding ElementName="TextBoxPhone" Path="(Validation.Errors)[0].ErrorContent"/>
                    </MultiBinding>
                </TextBlock.Text>
            </TextBlock>
            <!--Text="{Binding ElementName=DirectoryBox, Path=(Validation.Errors)[0].ErrorContent}"-->
        </StackPanel>
    </Grid>
</Window>

MainWindow.xaml.cs

To this file we add a Person class and then create and instance of it and set it the instance as the DataContext.

using System;
using System.Windows;
using System.ComponentModel;

namespace WpfTextBoxValidation
{
    /// <summary>
    /// Interaction logic for MainWindow.xaml
    /// </summary>
    public partial class MainWindow : Window
    {
        public MainWindow()
        {
            InitializeComponent();
            Person p = new Person();
            MainGrid.DataContext = p;
        }
    }

    public class Person
    {
        public String FirstName { get; set; }
        public String LastName { get; set; }
        public int Age { get; set; }
        public String Phone { get; set; }
    }
}

ErrorCollectionToVisibility.cs

This class is used to convert the Validation.Error collection to a Visibility.

There is a property Validation.HasError but for some reason it is not available to bind to. If it were, I would bind to it and use the built-in BooleanToVisibility converter. But since, I can’t, I used this ErrorCollectionToVisibility converter which simply returns Visible if there is at least one item in the collection or Collapse if the Collection is null or empty.

using System;
using System.Collections.ObjectModel;
using System.Windows;
using System.Windows.Controls;
using System.Windows.Data;

namespace WpfTextBoxValidation
{
    class ErrorCollectionToVisibility : IValueConverter
    {
        public object Convert(object value, Type targetType, object parameter, System.Globalization.CultureInfo culture)
        {
            ReadOnlyCollection<ValidationError> collection = value as ReadOnlyCollection<ValidationError>;
            if (collection != null && collection.Count > 0)
                return Visibility.Visible;
            else
                return Visibility.Collapsed;
        }

        public object ConvertBack(object value, Type targetType, object parameter, System.Globalization.CultureInfo culture)
        {
            return new object();
        }
    }
}

OverThirteenValidationRule.cs

Here we check if the value is greater than 13 and if not, we return the false ValidationResult.

using System;
using System.Windows.Controls;

namespace WpfTextBoxValidation
{
    public class OverThirteenValidationRule : ValidationRule
    {
        public override ValidationResult Validate(object value, System.Globalization.CultureInfo cultureInfo)
        {
            if (value != null)
            {
                int age = 0;
                try
                {
                    age = Convert.ToInt32(value);
                }
                catch
                {
                    return new ValidationResult(false, "You must be older than 13!");
                }

                if (age > 13)
                    return ValidationResult.ValidResult;

            }
            return new ValidationResult(false, "You must be older than 13!");
        }
    }
}

TextBoxNotEmptyValidationRule.cs

This validation just makes sure there is at least one character in a TextBlock.

using System;
using System.Windows.Controls;

namespace WpfTextBoxValidation
{
    public class TextBoxNotEmptyValidationRule : ValidationRule
    {
        public override ValidationResult Validate(object value, System.Globalization.CultureInfo cultureInfo)
        {
            string str = value as string;
            if (str != null)
            {
                if (str.Length > 0)
                    return ValidationResult.ValidResult;
            }
            return new ValidationResult(false, Message);
        }

        public String Message { get; set; }
    }
}

You have now learned to bind to Validation.ErrorContent.


How to make the WPF Canvas mouse click event work?

The problem with Canvas is that when you click on it, you don’t actually get the click event to occur unless you have a background that is not white.

One trick if you want white is to use white -1 or #FFFFFE or possibly Transparent (unless the parent is not white). So no one can tell it isn’t white, because it is as close to white as can be without actually being white.

Now your click event can occur.

Also you need to make the Canvas focusable.

Example 1 – Getting a Canvas to take keyboard focus from a TextBox with a mouse click

Here is how you make this happen.

  1. First create a new WPF Project.
  2. Add a Canvas and clear the any sizing.
  3. Change the Canvas Background to #FFFFFE.
  4. Set the Canvas to be Focusable.
  5. Add a TextBox in the Canvas.
  6. Create a mouse down event for the Canvas.

MainWindow.xaml

<Window x:Class="TextBoxInCanvas.MainWindow"
 xmlns="http://schemas.microsoft.com/winfx/2006/xaml/presentation"
 xmlns:x="http://schemas.microsoft.com/winfx/2006/xaml"
        Title="MainWindow" Height="350" Width="525">
    <Grid Name="MainGrid">
 <canvas name="<span class=" span="" class="hiddenSpellError" pre="class ">hiddenspellerror="" pre="">canvas1" Focusable="True" Background="#FFFFFE" MouseDown="canvas1_MouseDown"></canvas>
 <TextBox Height="23" Name="textBox1" Width="120" IsEnabled="True" Canvas.Left="81" Canvas.Top="115"
                     PreviewKeyDown="textBox1_PreviewKeyDown"/>
        </Canvas>
    </Grid>
</Window>

MainWindow.xaml.cs

using System.Windows;
using System.Windows.Input;
namespace TextBoxInCanvas
{
    /// <summary>
    /// Interaction logic for MainWindow.xaml
    /// </summary>
    public partial class MainWindow : Window
    {
        public MainWindow()
        {
            InitializeComponent();
        }

        private void canvas1_MouseDown(object sender, MouseButtonEventArgs e)
        {
            Keyboard.Focus(canvas1);
        }

        private void textBox1_PreviewKeyDown(object sender, KeyEventArgs e)
        {
            if (Key.Enter == e.Key)
                Keyboard.Focus(canvas1);
        }
    }
}

Now your click event occurs when the Canvas is clicked and keyboard focus is taken from the TextBox.

A Hello World Android App in C#

This post is a continuation of Writing Android apps in C# using MonoDroid.

Writing your first MonoDroid project

Now that you have installed and configured MonoDroid and its prerequisites, you are ready to create your first project.

  1. Open Visual Studio.
  2. Go to File | New | Project.
  3. Choose “Mono for Android”. This is a new project type added by the Mono for Android Visual Studio 2010 Plugin.
  4. Give the project a name and click OK.

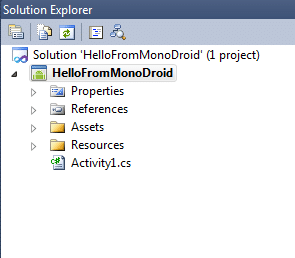
You now have a sample MonoDroid app.

Running your first MonoDroid App in an Emulator

Now that you have a sample MonoDroid app, learning to deploy it to an Android device and to test it is the next step.

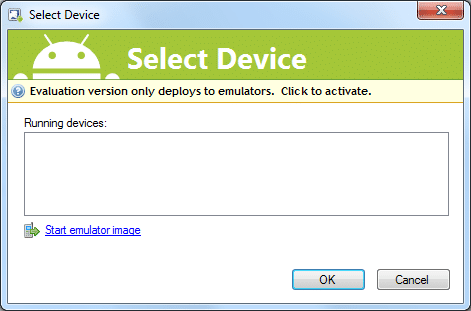
  1. Simply press F5 in your “Mono for Android” Visual Studio project. The following screen appears however, there are no running Android devices.
  2. Click the link to “Start emulator image”.
  3. Wait until your Android emulator starts and you see the graphical display and not just a text display.
  4. Select your emulator from the Running Devices list and click OK.
  5. Wait. It is going to deploy the mono library to your emulator and deploy your app and this can take time.

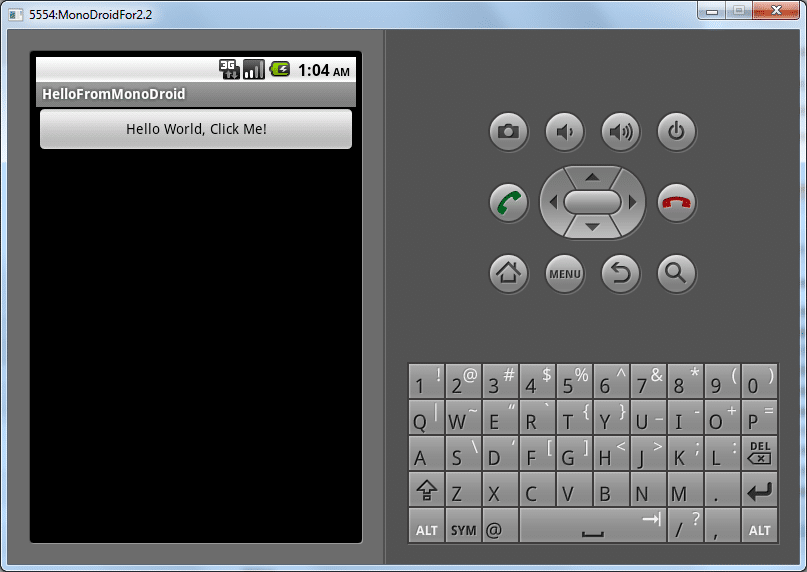
You application should now be running in your Android emulator.

This is just a sample application that increments a counter and displays how many times you have click the button.

You are now ready to start writing your own application.

More Tutorials

Xamarin has multiple Tutorials to help you get a little further along.

MonoDroid Tutororials by Xamarin

Writing Android apps in C# using MonoDroid

As C# developers, many of us would prefer to write Android Apps in C# as well. Novell had promised us MonoDroid, but we were quite concerned as to whether MonoDroid would ever be released when Novell was dismantled.

However, Xamarin spawned from the ashes like a phoenix to restore the viability of MonoDroid, restoring our hopes to writing in C# for the Android platform.

Though I am hopeful that MonoDroid will become popular allowing C# to be a commonly used language for Android devices, there is still some question as to whether Xamarin and its MonoDroid product will survive.

Xamarin is a new company and needs to survive first. Its business is to sell MonoDroid, which is not open source, but is a proprietary product. Unfortunately, MonoDroid may cost too much, preventing adoption among app developers. Xamarin requires a customer base and a continual adoption rate if it is going to survive. If the company folds, what is going to happen to the library and the apps that use it?

Is Development with MonoDroid Free? Yes and No!

Yes and no.

Yes because anybody can use and develop with MonoDroid at no cost. It isn’t until you need to publish an app to the app store that you need to buy a license. You can use the MonoDroid trial for as long as you want. Here is a quote from the trial website. [2]

The evaluation version of Mono for Android does not expire, but enables development and testing against the Android Emulator only.

No, because you need to buy a license once either of the following become true:

  1. You need to test your code directly on a real device and not just an emulated device
  2. You are ready to publish an app to the app store

So what is the cost of MonoDroid? Depends on if you buy Professional, Enterprise, or Enterprise Priority. On the Xamarin store, the following table can be found. To see it you have to add MonoDroid to your cart and then click the “Show product comparison” link. [1]

Professional Enterprise Enterprise Priority
Deploy to your devices Has this feature Has this feature Has this feature
Publish to app stores Has this feature Has this feature Has this feature
Enterprise distribution Has this feature Has this feature
Priority support queue Has this feature
Guaranteed response time Has this feature
License expiration Never Never Never
Update subscription 1 Year 1 Year 1 Year
License usage Original User Seat Seat
Price (USD) $399 $999 $2,499

These costs are very low for business or enterprise customers who have C# developers and want to write Android apps. The cost of training a C# developer to develop apps for Android in Java may be far greater than training them to develop apps for Android using C# and buying a MonoDroid license.

Is MonoDroid easy to set up?

MonoDroid is simple to set up. Xamarin has some simple steps that can be found on their web site. They have MonoDroid installation instructions for installing MonoDroid for use with any of three environments.

  1. Visual Studio (Important! Visual Studio Express is not supported)
  2. MonoDevelop on Windows
  3. MonoDevelop on Mac OSX

If you don’t have a Visual Studio license and you can’t afford one, then go with MonoDevelop because Visual Studio Express is noted to be enough [3].

However, the Visual Studio install is four simple steps.

  1. Install the Java SDK
  2. Install the Android SDK
  3. Configure your simulator
  4. Install the Mono for Android Visual Studio 2010 Plugin

These are very easy steps to complete, and I won’t repeat the steps here, but once you complete them, you are ready to start writing Android apps in C#.

Once you feel you have everything installed, click the following link to continue reading.

Writing your first MonoDroid project


http://android.xamarin.com/Installation/Windows