Archive for the ‘MVVM’ Category.

Binding to ICommand with Xamarin Forms

Alternate title

Why a Xamarin forms Button bound to ICommand doesn’t enable or disable automtically via CanExecute

So I’ve been pretty excited about Xamarin Forms being implemented with Xaml. I recently decided to take time to implement binding using MVVM and just see how it works.

I used to use a common object called RelayCommand that implemented the ICommand interface. However, there is no need for this object in Xamarin Forms, because Xamarin Forms has Command and Command<T> that both implement this.

So in WPF, I have an example for ICommand. It used both

<UserControl x:Class="RelayCommandExample.View.HelloWorldView"
             xmlns="http://schemas.microsoft.com/winfx/2006/xaml/presentation"
             xmlns:x="http://schemas.microsoft.com/winfx/2006/xaml"
             xmlns:mc="http://schemas.openxmlformats.org/markup-compatibility/2006" 
             xmlns:d="http://schemas.microsoft.com/expression/blend/2008" 
             mc:Ignorable="d"
             d:DesignHeight="200"
             d:DesignWidth="300"
             >
    <Grid>
        <Grid.RowDefinitions>
            <RowDefinition Height="Auto"/>
            <RowDefinition Height="Auto"/>
            <RowDefinition/>
        </Grid.RowDefinitions>
        <Label Grid.Row="0">
            <TextBlock Text="{Binding Text}" />
        </Label>
        <Button Grid.Row="1" Content="{Binding Button1.Text}" Command="{Binding Button1.Command}"/>
    </Grid>
</UserControl>

I have some simple view model properties that this view binds to.

	public String Text
	{
		get { return _Text; }
		set { SetProperty(ref _Text, value); }
	} private string _Text;

	public ButtonViewModel Button1
	{
		get
		{
			return _Button1 ?? (_Button1 = new ButtonViewModel
			{
				Text = "Click me!",
				Command = new RelayCommand(f => Button1Clicked(), f => Button1CanClick())
			});
		}
	} private ButtonViewModel _Button1;        

	private void Button1Clicked()
	{
		Text = "Button clicked " + ++_ClickCount + " times.";
	} private int _ClickCount;

	private bool Button1CanClick()
	{
		return _ClickCount < 10;
	}

I also used a ButtonViewModel in the above code. Note: My ButtonViewModel is far more advanced than this, but for this example, it has been stripped down to only the Button.Text and Button.Command.

    public class ButtonViewModel : ViewModelBase
    {
        public string Text
        {
            get { return _Text; }
            set { SetProperty(ref _Text, value); }
        } private string _Text;

        public RelayCommand Command
        {
            get { return _Command; }
            set { SetProperty(ref _Command, value); }
        } RelayCommand _Command;
    }

As you see, Button1CanClick() returns true for the first ten clicks, then returns false. That means the button should be enabled to start, but it should automatically disable after the tenth click. This works perfectly in WPF.

However, when I ported this code over to Xamarin Forms, I had a few problems.

CommandManager.RequerySuggested missing

The project didn’t build because RelayCommand references CommandManager.RequerySuggested which doesn’t work because it is part of PresentationCore, a library which doesn’t exist in Xamarin Forms.
Resolution: I replaced RelayCommand with Command from Xamarin Forms.

    public ButtonViewModel Button1
    {
        get
        {
            return _Button1 ?? (_Button1 = new ButtonViewModel
            {
                Text = "Click me!",
                Command = new Command(f => Button1Clicked(), f => Button1CanClick())
            });
        }
    } private ButtonViewModel _Button1;
    public class ButtonViewModel : ViewModelBase
    {
        public string Text
        {
            get { return _Text; }
            set { SetProperty(ref _Text, value); }
        } private string _Text;

        public Command Command
        {
            get { return _Command; }
            set { SetProperty(ref _Command, value); }
        } Command _Command;
    }

The project built perfectly and ran after that.

CanExecute method is not called after each click

The button didn’t disabled after 10 clicks. In fact, the CanExecute method was only called once at first load. I expected it to be called by any number of events, but it was never called. In WPF, it is CommandManager.RequerySuggested that makes this work, so with that code not existing, the CanExecuteChanged event must be fired manually.

Well, it seems that a simple way to do this would be to subscribe to the PropertyChanged event. So I deviced to bring back RelayCommand only this time inherit from Command.

using System;
using System.ComponentModel;
using Xamarin.Forms;

namespace MVVM
{
    public class RelayCommand : Command
    {
        public RelayCommand(Action<object> execute)
            : base(execute)
        {
        }

        public RelayCommand(Action execute)
            : this(o => execute())
        {
        }

        public RelayCommand(Action<object> execute, Func<object, bool> canExecute, INotifyPropertyChanged npc = null)
            : base(execute, canExecute)
        {
            if (npc != null)
                npc.PropertyChanged += delegate { ChangeCanExecute(); };
        }

        public RelayCommand(Action execute, Func<bool> canExecute, INotifyPropertyChanged npc = null)
            : this(o => execute(), o => canExecute(), npc)
        {
        }
    }
}

Now I can go back to using RelayCommand only add a parameter to pass the host object, using the keyword this.

    public ButtonViewModel Button1
    {
        get
        {
            return _Button1 ?? (_Button1 = new ButtonViewModel
            {
                Text = "Click me!",
                Command = new Command(f => Button1Clicked(), f => Button1CanClick(), this)
            });
        }
    } private ButtonViewModel _Button1;

So every time the PropertyChanged event fires, CanExecute is called. Note that for production, you may have to do checks outside of when the PropertyChanged event fires depending on what you are evaluating in CanExecute.

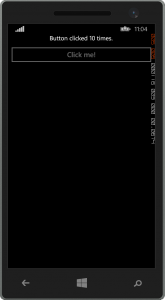
Button disabled by CanExecute

It works in Android and iOS as well.

Xamarin Forms Conclusion

I have no complaints with the technology. XAML and Binding and MVVM appear to be working quite well. All the benefits declarative UI and MVVM layers, combined with the ability to code for all mobile platforms in one place, in one language. It would be too hard to create full desktop app in WPF either as the ViewModel is reuseable. Xamarin also supports Mac OSX. So really you are looking at the future go to tool for building cross platform applications that aren’t web-based.
Using Aspect Oriented Programming to implement INotifyPropertyChanged as an attribute

Using Aspect Oriented Programming, specifically PostSharp, they have implemented INotifyPropertyChanged in two ways:

  1. A simple single INotifyPropertyChanged aspect as described here: http://www.sharpcrafters.com/solutions/notifypropertychanged
  2. The Definitive INotifyPropertyChanged which can be found here: http://www.sharpcrafters.com/blog/category/Toolkits.aspx

I recommend you look at both of those methods and see if they meet your needs. Of they do use them.

I didn’t find either implementation to my liking. The first is too simple, and the second is too complex. Both seem to think that I am going to want all my properties to kick off the OnPropertyChanged event. They both implement the class as follows.

[NotifyPropertyChanged]
public class Person
{
    public int Id { get; set; }

    public string FirstName { get; set; }

    public string LastName { get; set; }
}

All three properties will implement INotifyPropertyChanged even though it may be that Id never changes or if it does change, there is no need to notify anything.

NotifyPropertyChanged Attribute Expectations

Here is how I want to use Aspect Oriented Programming in my MVVM objects.

// This adds the interface and the OnNotifyPropertyChanged method.
[NotifyPropertyChangedClass]
public class Person
{
    // Does NOT call OnNotifyPropertyChanged
    public int Id { get; set; }

    // Calls OnNotifyPropertyChanged
    [NotifyPropertyChanged]
    public string FirstName { get; set; }

    // Calls OnNotifyPropertyChanged
    [NotifyPropertyChanged]
    public string LastName { get; set; }
}

Now, I also want to be able to specify the notifying of a property changed:

[NotifyPropertyChangedClass]
public class Person
{
    // Does NOT call OnNotifyPropertyChanged
    public int Id { get; set; }

    // Calls OnNotifyPropertyChanged for the property and the string params passed in.
    [NotifyPropertyChanged("LastCommaFirst", "FirstLast")]
    public string FirstName { get; set; }

    // Calls OnNotifyPropertyChanged
    [NotifyPropertyChanged]
    public string LastName { get; set; }

    public string LastCommaFirst
    {
        get { return string.Format("{1}, {0}", FirstName, LastName); }
    }

    public string FirstLast
    {
        get { return string.Format("{1}, {0}", FirstName, LastName); }
    }
}

Aspect MVVM

I was able to implement this with three very simple files: 1 interface, and two aspects. Here is how I implemented this:

The first file, INotifyPropertyChangedWithMethod.cs, is an interface that inherits from INotifyPropertyChanged. I used this to get access to the OnPropertyChanged event method.

using System.ComponentModel;

namespace MVVM
{
    public interface INotifyPropertyChangedWithMethod : INotifyPropertyChanged
    {
        void OnPropertyChanged(string propertyName);
    }
}

The second object is basically the same as the simple single INotifyPropertyChanged aspect, except it only implements the interface and does nothing to the setters.

using System;
using System.ComponentModel;
using PostSharp.Aspects;
using PostSharp.Aspects.Advices;
using PostSharp.Extensibility;
using PostSharp.Reflection;

namespace MVVM
{
    [Serializable]
    [IntroduceInterface(typeof(INotifyPropertyChangedWithMethod), OverrideAction = InterfaceOverrideAction.Ignore)]
    [MulticastAttributeUsage(MulticastTargets.Class, Inheritance = MulticastInheritance.Strict)]
    public sealed class NotifyPropertyChangedClassAttribute : InstanceLevelAspect, INotifyPropertyChangedWithMethod
    {

        [ImportMember("OnPropertyChanged", IsRequired = false, Order = ImportMemberOrder.AfterIntroductions)]
        public Action OnPropertyChangedMethod;

        [IntroduceMember(Visibility = Visibility.Family, IsVirtual = true, OverrideAction = MemberOverrideAction.Ignore)]
        public void OnPropertyChanged(string propertyName)
        {
            if (this.PropertyChanged != null)
            {
                PropertyChanged(Instance, new PropertyChangedEventArgs(propertyName));
            }
        }

        [IntroduceMember(OverrideAction = MemberOverrideAction.Ignore)]
        public event PropertyChangedEventHandler PropertyChanged;
    }
}

The final aspect is one that I use on the properties.

using System;
using PostSharp.Aspects;

namespace MVVM
{
    [Serializable]
    public class NotifyPropertyChanged : LocationInterceptionAspect
    {
        public NotifyPropertyChanged()
            : this(true, null)
        {
        }

        public NotifyPropertyChanged(params string[] inProperty)
            : this(true, inProperty)
        {
        }

        public NotifyPropertyChanged(bool inNotifyCurrentProperty, params string[] inProperty)
        {
            _NotifyCurrentProperty = inNotifyCurrentProperty;
            _OtherProperties = inProperty;
        }

        private readonly string[] _OtherProperties;
        private readonly bool _NotifyCurrentProperty;

        public override void OnSetValue(LocationInterceptionArgs args)
        {
            // Do nothing if the property value doesn't change
            if (args.Value == args.GetCurrentValue())
                return;

            args.ProceedSetValue();

            var npc = args.Instance as INotifyPropertyChangedWithMethod;
            if (npc != null)
            {

                // Notify for current property
                if (_NotifyCurrentProperty)
                    npc.OnPropertyChanged(args.Location.PropertyInfo.Name);

                // Notify for other properties
                if (_OtherProperties != null)
                {
                    foreach (string otherProperty in _OtherProperties)
                    {
                        npc.OnPropertyChanged(otherProperty);
                    }
                }
            }
        }
    }
}

My MVVM objects still include RelayCommand, but they no longer need ObservableObject or ViewModelBase.

Differences Encountered using Aspect MVVM

Calling OnPropertyChanged or Adding to the PropertyChanged event

First, since the classes themselves don’t actually have code for INotifyPropertyChanged or the OnPropertyChanged method, what do you do if you need to actually call OnPropertyChanged in one of the classes methods instead of in a property? What if you need to add an method to the PropertyChanged event? Visual Studio is going to give compile errors? Both are easily doable using the interface.

private void SomeMethod(object sender)
{
    var npc = this as INotifyPropertyChangedWithMethod;
    if (npc != null)
        npc.OnPropertyChanged("Sentences");
}


private void Instance_SearchWordsChangedEvent(object sender)
{
    var npc = MyObject as INotifyPropertyChangedWithMethod;
    if (npc != null)
        npc.PropertyChanged += NpcOnPropertyChanged;
}

private void NpcOnPropertyChanged(object sender, PropertyChangedEventArgs propertyChangedEventArgs)
{
    // code here...
}

Download

Here is a sample project and a project template and also a separate AspectMVVM project if you want the code. I’ll open source it on CodePlex.com soon.

AspectMVVM Example Project.zip
AspectMVVM Project Template.zip
AspectMVVM.zip

An actual in-production MVVM architecture

Actual MVVM Design

So the last project where I implemented MVVM that is in production for an enterprise product, the design pattern actually grew to included more than just the three items: Model, View, ViewModel.

Instead it looked like the image you see to the right.

The arrows indicate access.

  • Controller – Has access to all other objects. Basically the controller is created and it loads the first Views and ViewModels and assigns the DataContext of the Views.
  • View –  The view is only consumed by the controller (and dynamically so the controller doesn’t actually reference the View project or dll). Since the view is completely independent it can be replaced any time. The View is only connected to the ViewModel through binding when the controller assigns a ViewModel to the DataContext of a View.
  • ViewModel – An adapter layer on top of the model and business that also implements the necessary objects that are expected in the View’s bindings. The ViewModel communicates with the controller in order to tell it to change screens/switch to a new view. It is important in this design to note that the ViewModel never references the View and is completely independent of the View, which allows it to be applied to any View.
  • Business – The code that actual does the work. It only needs access to the Model but both the Controller and ViewModel have access to use it. However, the Controller seldom uses it but the ViewModel heavily uses it.
  • Model – Data objects. It doesn’t know about anything else, but the Controller, Business, and ViewModel all know about the Model.

How this design formed

Originally the MVVM pattern was used and the project started as a single project, with a separate folder and namespace for Model-View-ViewModel times.

As the application progressed, this design was created as separation of concerns were applied to each layer and as items were broken out into separate projects/dlls.

Why the Controller became a separate layer

Initially it seems that the View or the ViewModel (either) could handle being the Controller. However, we found that neither the View or the ViewModel acting as the Controller was a good idea for a couple of reasons. First, if the View or the ViewModel were also the Controller then they became dependent on too many items. It became clear quickly that the ViewModel was a better choice of the two and so it was chosen at first. However, with references to the View available to the ViewModel, developers began to cheat and couple the View to the ViewModel, until the ViewModel could not build without that exact View and the View was supposed to be dynamic and interchangeable.

So to keep the View decoupled from the ViewModel and visa-versa, a separate Controller project was created and no reference between the View or ViewModel was allowed.

Note: Actually the Business and Controller layers are in the same dll.

Why the Business layer was separated from the ViewModel

Initially the Business layer and the ViewModel layer were the same layer. Some of the business existed directly in the ViewModel and some were in separate classes. It quickly became apparent that the ViewModels were 1) getting too large, and 2) breaking the single responsibility principle. It became apparent that in order to maintain small class files and the single responsibility principle that the Business needed to exist outside of the ViewModel and the ViewModel would simply call the a single Business object or method when needed.

Other mistakes

Initially the Controller was a single class, then we realized that it was doing about ten things, and was over 1000 lines. Oops. It was refactored into separate objects, some of which actually turned out to belong in the business layer.  So it appeared that we allowed the business layer to bleed into the controller. As the file was analyzed it was clear that a certain amount of methods and properties were only for a particular use and so these were extracted to a separate class. This was actually repeated multiple times for different uses, after which, the controller returned to just being a controller and it was a smaller easy to maintain class.

Future architecture changes

As the product continued to grow, other changes are seen as necessary even though they haven’t yet been implemented.

Separation of the Controller from the Business layer

A few of the business objects were for the Controller only and the rest of the business objects are for the ViewModel only. Since the Controller and Business layers are still in the same dll, this doesn’t yet matter. However, it was becoming clear as the project grew that the Controller has its business and the ViewModel/functionality had it Business and there is little overlap if any. It is likely that the Controller and Business layer will see a separation and decoupling where the Controller no longer references the Business layer and the business classes used by the Controller is just part of the Controller.

View communication with the DataContext without binding

There arose instances where binding was not supported or did not exist. In many cases we used attached properties or an inherited object and added the missing bindings, however, in some instances this didn’t make sense. What if the View needed to send a message to the DataContext or pass and event to the code behind and neither inheriting the object to add the binding or using an attached property made sense. What made sense was an interface.

I recently posted an article on Creating an Interface for data binding in Views with WPF. Imagine a new layer that exists between the View and the ViewModel called IViewModel. Both the View and the ViewModel reference it and they still don’t reference each other. An interface in the IViewModel project/dll would mainly include properties that help the ViewModel know what is needed for binding. However, in such rare circumstances that it makes sense to communicate to the DataContext, the View can check if the DataContext implements an interfaces and calls a method the interface defines.

MVVM and Drag and Drop Command Binding with an Attached Behavior

Drag and drop works quite well already with some UIElements, such as TextBox. However, you may want to using MVVM and binding to bind a command for dragging and dropping to a UIElement that doesn’t support drag and drop, such as a Grid or other container.

This can easily be done using an Attached Behavior. You may know what an Attached Property is and you may be wondering, what is the difference between an Attached Behavior and an Attached Property. An Attached Behavior is a type of an Attached Property that involves certain events, often user interaction events such a drag and drop.

Creating an Attached Behavior for use in WPF

So what is the basic recipe for creating an Attached Behavior.

  1. Use a public static class
  2. Add a static Dependency Property and and an associated PropertyChangedCallBack method (after testing, these can be private)
  3. Add a public method that is a static setter and getter (after testing the getter can be private)
  4. Add any static helper methods (usually these could be private)
  5. Add any additional code that is needed.

Handling Drag and Drop in WPF

If you are going to handle Drag and Drop in WPF, you need to make yourself acquainted with a particular static object called DataFormats (System.Windows.DataFormats, as there exists one in the Forms namespace too).   This object is going to help you. Microsoft says that the DataFormats class provides a set of predefined data format names that can be used to identify data formats available in the clipboard or drag-and-drop operations.[1You should take a moment to read about this class if you are not familiar with it. IDataObject and DataObject (which implements IDataObject) are also important to know and you should read about those as well.

Determine which types of data your need to handle with Drag and Drop. For each data type you plan to handle, you should check if the drag and drop data is that type and if so, handle it. You have the option to handle this in the code behind or in the behavior.

Also, with UIElements in WPF, the drag events are separate from the drop events, so we really don’t need a DragBehavior or DragAndDropBehavior, instead we only need a DropBehavior.[2]  You should read about the drag and drop events and understand which one you need to add a behavior too. We are going to use the PreviewDrop event.

Writing a DropBehavior

Ok, now that we have gained the knowledge we need, lets write a DropBavior static class.

  1. Create a new class and call it DropBehavior.
  2. Make the class both public and static.
  3. Add a DependecyProperty called PreviewDropCommandProperty (Lines 13 – 26).
  4. Create the Setter and Getter functions. (Lines 28-57)
  5. Create the PropertyChangedCallBack method. (Lines 59-78)
using System.Windows.Input;
using System.Windows;

namespace MVVM
{
    /// <summary>
    /// This is an Attached Behavior and is intended for use with
    /// XAML objects to enable binding a drag and drop event to
    /// an ICommand.
    /// </summary>
    public static class DropBehavior
    {
        #region The dependecy Property
        /// <summary>
        /// The Dependency property. To allow for Binding, a dependency
        /// property must be used.
        /// </summary>
        private static readonly DependencyProperty PreviewDropCommandProperty =
                    DependencyProperty.RegisterAttached
                    (
                        "PreviewDropCommand",
                        typeof(ICommand),
                        typeof(DropBehavior),
                        new PropertyMetadata(PreviewDropCommandPropertyChangedCallBack)
                    );
        #endregion

        #region The getter and setter
        /// <summary>
        /// The setter. This sets the value of the PreviewDropCommandProperty
        /// Dependency Property. It is expected that you use this only in XAML
        ///
        /// This appears in XAML with the "Set" stripped off.
        /// XAML usage:
        ///
        /// <Grid mvvm:DropBehavior.PreviewDropCommand="{Binding DropCommand}" />
        ///
        /// </summary>
        /// <param name="inUIElement">A UIElement object. In XAML this is automatically passed
        /// in, so you don't have to enter anything in XAML.</param>
        /// <param name="inCommand">An object that implements ICommand.</param>
        public static void SetPreviewDropCommand(this UIElement inUIElement, ICommand inCommand)
        {
            inUIElement.SetValue(PreviewDropCommandProperty, inCommand);
        }

        /// <summary>
        /// Gets the PreviewDropCommand assigned to the PreviewDropCommandProperty
        /// DependencyProperty. As this is only needed by this class, it is private.
        /// </summary>
        /// <param name="inUIElement">A UIElement object.</param>
        /// <returns>An object that implements ICommand.</returns>
        private static ICommand GetPreviewDropCommand(UIElement inUIElement)
        {
            return (ICommand)inUIElement.GetValue(PreviewDropCommandProperty);
        }
        #endregion

        #region The PropertyChangedCallBack method
        /// <summary>
        /// The OnCommandChanged method. This event handles the initial binding and future
        /// binding changes to the bound ICommand
        /// </summary>
        /// <param name="inDependencyObject">A DependencyObject</param>
        /// <param name="inEventArgs">A DependencyPropertyChangedEventArgs object.</param>
        private static void PreviewDropCommandPropertyChangedCallBack(
            DependencyObject inDependencyObject, DependencyPropertyChangedEventArgs inEventArgs)
        {
            UIElement uiElement = inDependencyObject as UIElement;
            if (null == uiElement) return;

            uiElement.Drop += (sender, args) =>
            {
                GetPreviewDropCommand(uiElement).Execute(args.Data);
                args.Handled = true;
            };
        }
        #endregion
    }
}

Using the DropBehavior in XAML

Ok, now it is really easy to add this to a Grid or other UIElement that doesn’t already handle Drag and Drop. If you try to add this to a TextBlox, which already handles Drag and Drop, this even doesn’t fire.

Examples

You can add the DropBehavior to a UserControl

<UserControl x:Class="DropBehaviorExample.ExampleView"
             xmlns="http://schemas.microsoft.com/winfx/2006/xaml/presentation"
             xmlns:x="http://schemas.microsoft.com/winfx/2006/xaml"
             xmlns:mc="http://schemas.openxmlformats.org/markup-compatibility/2006"
             xmlns:d="http://schemas.microsoft.com/expression/blend/2008"
             xmlns:MVVM="clr-namespace:MVVM"
             mc:Ignorable="d"
             d:DesignHeight="300"
             d:DesignWidth="400"
             AllowDrop="True"
             MVVM:DropBehavior.PreviewDropCommand="{Binding PreviewDropCommand}"
             >
    <Grid>
    </Grid>
</UserControl>

Or you can add the DropBehavior to a Grid.

<UserControl x:Class="DropBehaviorExample.ExampleView"
             xmlns="http://schemas.microsoft.com/winfx/2006/xaml/presentation"
             xmlns:x="http://schemas.microsoft.com/winfx/2006/xaml"
             xmlns:mc="http://schemas.openxmlformats.org/markup-compatibility/2006"
             xmlns:d="http://schemas.microsoft.com/expression/blend/2008"
             xmlns:MVVM="clr-namespace:MVVM"
             mc:Ignorable="d"
             d:DesignHeight="300"
             d:DesignWidth="400"
             AllowDrop="True"
             >
    <Grid MVVM:DropBehavior.PreviewDropCommand="{Binding PreviewDropCommand}">
    </Grid>
</UserControl>

And of course, you can put it on any UIElement that doesn’t already handle drag and drop.

Implementing the ICommand in the ViewModel

The following code is all you need in your ViewModel to bind the PreviewDropCommand.

        #region The RelayCommand that implements ICommand
        public ICommand PreviewDropCommand
        {
            get { return _PreviewDropCommand ?? (_PreviewDropCommand = new RelayCommand(HandlePreviewDrop)); }
            set
            {
                _PreviewDropCommand = value;
                NotifyPropertyChanged("PreviewDropCommand");
            }
        } private ICommand _PreviewDropCommand;

        #endregion

        #region The method encapsulated in the relay command
        private void HandlePreviewDrop(object inObject)
        {
            IDataObject ido = inObject as IDataObject;
            if (null == ido) return;

            // Get all the possible format
            string[] formats = ido.GetFormats();

            // Do what you need here based on the format passed in.
            // You will probably have a few options and you need to
            // decide an order of preference.
        }
        #endregion

Hope this helps you. I know when I first rounded up this information online, it was hard to understand because of lack of preparation information, so I made sure to provide that, and also lack of comments, so I made sure to provide that.

A snippet for Properties in a ViewModel

If you are using MVVM you probably should create a snippet very similar to the following to save time.

C:\Program Files (x86)\Microsoft Visual Studio 10.0\VC#\Snippets\1033\Visual C#\propvm.snippet

<?xml version="1.0" encoding="utf-8" ?>
<CodeSnippets  xmlns="http://schemas.microsoft.com/VisualStudio/2005/CodeSnippet">
	<CodeSnippet Format="1.0.0">
		<Header>
			<Title>propvm</Title>
			<Shortcut>propvm</Shortcut>
			<Description>Code snippet for property and backing field for a ViewModel that calls NotifyPropertyChanged.</Description>
			<Author>Jared Barneck</Author>
			<SnippetTypes>
				<SnippetType>Expansion</SnippetType>
			</SnippetTypes>
		</Header>
		<Snippet>
			<Declarations>
				<Literal>
					<ID>type</ID>
					<ToolTip>Property type</ToolTip>
					<Default>int</Default>
				</Literal>
				<Literal>
					<ID>property</ID>
					<ToolTip>Property name</ToolTip>
					<Default>MyProperty</Default>
				</Literal>
			</Declarations>
			<Code Language="csharp"><![CDATA[public $type$ $property$
	{
		get { return _$property$;}
		set 
		{ 
			_$property$ = value;
			NotifyPropertyChanged("$property$");
		}
	} private $type$ _$property$;
	$end$]]>
			</Code>
		</Snippet>
	</CodeSnippet>
</CodeSnippets>

A quick overview of MVVM

Model View ViewModel (MVVM) is a design pattern based on Model View Controller (MVC) but specifically tailored to Windows Presentation Foundation (WPF).

MVVM is not a framework per se but many frameworks have been created. Here is a list of MVVM Frameworks from Wikipedia.

See the Wikipedia site here: Open Source MVVM Frameworks.

Another blog, has some basic information on many of these here: A quick tour of existing MVVM frameworks

A framework is actually not necessary to implement MVVM and you should seriously consider whether using one is right for your WPF application or not. Many applications do not need much of the features the frameworks provide. However, there are two common classes that all MVVM frameworks contain. These are ViewModelBase and RelayCommand. Though some frameworks may give them different names or implement them slightly differently, they all have these classes. For example, MVVM Foundation names the ViewModelBase differently. It is called ObservableObject, which is more appropriate because it is incorrect to assume that all objects that implement INotifyPropertyChanged are going to be ViewModel objects.

Instead of installing and using an MVVM framework, you could simply include these classes in your application, as these are all you need to implement MVVM.

  • ObservableObject
  • RelayCommand

While these two classes are enough, you may want to investigate how different MVVM Frameworks implement and what else they implement and why. You may find that another feature implemented is exactly what you need in your application and knowing about it could save you time.

Refreshing a button enabled/disabled by RelayCommand.CanExecute

When using the RelayCommand class, a command class used for MVVM development, you may find times when a button that is enabled or disabled based on RelayCommand.CanExecute does not refresh until a keyboard or mouse click.  When this happens you may have to manually force this refresh to occur. You can force the refresh in the ViewModel with this function:

CommandManager.InvalidateRequerySuggested();

If you want to see this in action, you can download the LDPing project I have recently made.

svn co https://ldmsplugins.svn.sourceforge.net/svnroot/ldmsplugins/LDPing

You don’t need to know about LANDesk or know what an LDPing is to understand what is going on enough to see how to use this one function. In the LDPing project, clicking the button starts a background process to run an LDPing. The button disables when clicked. Once the ping is finishes, the button should enable, however, originally it didn’t enable.  I had to add the CommandManager.InvalidateRequerySuggested() function.

Here is the code:

        /// <summary>
        /// This is the Ping method that launches an LDPing as a BackgroundWorker process, using
        /// PingWorker which is an object that inherits BackgroundWorker and adds one property called
        /// PingSucceeded.
        /// </summary>
        private void Ping()
        {
            IsPinging = true;
            ClearPingResults();

            PingWorker worker = new PingWorker();
            worker.DoWork += new DoWorkEventHandler(worker_DoPing);
            worker.RunWorkerCompleted += new RunWorkerCompletedEventHandler(worker_PingCompleted);
            worker.RunWorkerAsync();
        }

        void worker_DoPing(object sender, DoWorkEventArgs e)
        {
            Stopwatch timer = new Stopwatch();
            timer.Start();

            // Now lets ping
            PingWorker worker = sender as PingWorker;
            LDPing tmpLDPing = LDPingAction.AgentPing(IPAddress);
            if (tmpLDPing == null)
                worker.PingSucceeded = false;
            else
                worker.PingSucceeded = true;
            timer.Stop();

            // Lets make sure the GUI spinner has at least a little spin
            int i = 1200 - (int)timer.ElapsedMilliseconds;
            if (i > 0)
                Thread.Sleep(i);
            LDPing = tmpLDPing;
        }

        void worker_PingCompleted(object sender, RunWorkerCompletedEventArgs e)
        {
            IsPinging = false;
            PingWorker worker = sender as PingWorker;
            if (worker.PingSucceeded)
                ConnectionResult = "Ping Successful.";
            else
                ConnectionResult = "Ping failed.";

            // This makes the UI refresh against the RelayCommand.CanExecute() function.
            // Essentially, this makes the button enable when pinging is done.
            CommandManager.InvalidateRequerySuggested();
        }

Without the CommandManager.InvalidateRequerySuggested() function, the button’s enabled state doesn’t refresh until an event such as a keyboard or mouse click.

How to animate an edit box to slide in and out using Expression Blend

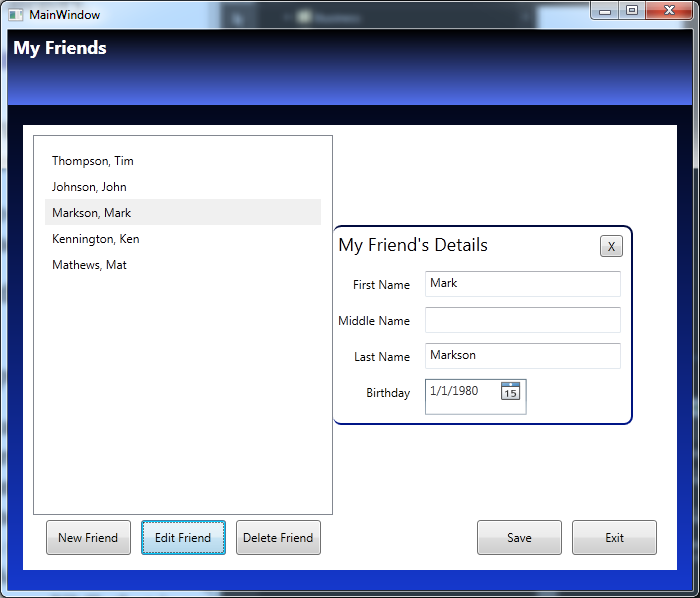
Ok…so I created a simple WPF and MVVM application called My Friends.  This is just a simple applications, the main goal was not to create a My Friend app, but do demonstrate how to make an edit box slide in an out.

The application is too big to give you step by step instructions to create the whole application, so instead, I am going to make it available for download and then tell you how to see the changes.

  1. Download and extract the solution from the link below:
    MyFriends.zip
  2. Open the project in Expression Blend (not Visual Studio).
  3. Get to know the Application. (Ok, I guess you could do this part in Visual Studio…but the intent is to learn an Expression Blend feature.)
    Check out the Person and PersonCollection classes in the Model folder.
    Check out the Views and the corresponding ViewModels and look at the binding statements.
    The MVVM folder has some standard MVVM classes, that if you know MVVM you should be familiar with.
    The business has an XML Serialization helper class.
    The data folder contains an XML that is serialized from the PersonCollection class.
  4. In Expression Blend, open the View\FriendListView.xaml.
  5. In the Objects and Timeline tab, get to know the assets that are being used. (I think they are all standard assets. I don’t think I am using anything that doesn’t come with .NET and Expression Blend by default.)
  6. In the Objects and Timeline tab, specifically look at the PersonDetailsView object.
    Notice it is behind the FriendList.
    This is the edit box that is animated and it will slide to the right when you click edit.
  7. Go to the States tab.
    Look a the State group that is created. There are two groups: EditFriendOpenState and EditFriendClosedState.  The names should be obvious.
    Notice the Transition duration is set to .5 and notice the Easing function.
  8. There is a behavior or action called GoToStateAction that was dragged over the Edit button and configured to change the state to EditFriendOpenState.
  9. The GoToStateAction was also dragged over the X button on the edit page and configured to change the state toEditFriendClosedState.
  10. Build the application and see how the state changes and how it uses the Easing function for .5 seconds to slide the edit field out.

Here is a sample image:

Anyway, I hope you find this a fun sample application to learn with.


This project is also an example of:

  • Basic C#
  • Xml Serialization
  • MVVM (including ICommand and RelayCommand with buttons)
  • Using Data Converters (as one converter is used)

Exercises for further learning:

LINQ exercise

  • There is a comment in the View\FriendListView.xaml that uses LINQ, but there is a reason LINQ wasn’t used, can you determine the reason.
  • What would you have to do to use LINQ and make the application work?

DateTime exercise

  • There is an Age property that was left commented out.  Uncomment it, make it read-only and make it provide the correct number in years based on the Birthday.

Expression Studio Training Videos – A check list of videos from Expression.Microsoft.com

There are a lot of free training videos at the Expression 4 web site. However, this web site has two problems:

  1. The videos aren’t necessarily in order.
  2. There is not defined method to track your learning progress as you watch them.

Well, now it is easy. Just copy and paste this page, or easier, download this Excel document:

Expression Training Videos.xls

You can now track you progress as you self-train and go through the Expression 4 training videos.

Training Subjects


Expression Studio

Introducing Expression 4 (eight videos)
Completed Introduction Videos
Introduction to Expression Studio Ultimate
Introduction to Expression Web
Introduction to Expression Blend
Introduction to SketchFlow, a feature of Expression Studio Ultimate
Introduction to Expression Encoder Pro
Expression Web Demo Overview
Expression Blend and SketchFlow Demo Overview
Expression Encoder Pro Demo Overview
Getting Started with Silverlight – For Designers (eleven video series)
Completed Beginner Videos
What is Silverlight? An Overview
Understanding and Working with XAML Code in Expression Blend
Creating Vector-Based Artwork with Expression Design
Applying Color and Effects to Projects using Expression Design
Organizing Your Project using Layout Containers in Expression Blend
Editing the Appearance of Your Project Items using Expression Blend
Exploring the Objects and Timeline Task Pane in Expression Blend
Customizing Silverlight Video Players using Expression Blend
Optimizing Video for Silverlight Playback using Expression Encoder
Adding Interactivity to Silverlight Projects using Expression Blend
Publishing Silverlight Projects to the Web using Expression Blend
Getting Started with Standards-Based Design (ten video series)
Completed Training
Understanding the Benefits of Standards-Based Design with Expression Web
Styling Text using CSS with Expression Web
Understanding CSS Pseudo Classes for Styling Links using CSS with Expression Web
Understanding CSS Margins and Padding with Expression Web
Using CSS Positioning for Layout with Expression Web
Adding Background Images Using CSS with Expression Web
Using CSS Floats to Create Flexible Page Layouts with Expression Web
Clearing CSS Floats with Expression Web
Adding JavaSript to Your Site with Expression Web
Using External CSS Stylesheets with Expression Web


Prototyping

Additional Expression Blend Training Videos
Download the assets, step-by-step guide, and video package (127MB)
Completed Training
Introducing SketchFlow with Expression Blend 3
Adding Navigation Screens in SketchFlow with Expression Blend 3
Building Basic Layout in SketchFlow with Expression Blend 3
Using SketchStyle Controls to Enhance a SketchFlow Layout with Expression Blend 3
Working with Components in a SketchFlow Project with Expression Blend 3
Adding Navigation to Buttons in SketchFlow with Expression Blend 3
Working with States in SketchFlow with Expression Blend 3
Working with the SketchFlow Animation Panel with Expression Blend 3
Working with Behaviors in SketchFlow with Expression Blend 3
Using Sample Data in SketchFlow with Expression Blend 3
Exporting your SketchFlow project with Expression Blend 3
Adding Feedback and Annotations in the SketchFlow Player with Expression Blend 3


Additional Videos


Additional Expression Blend Training Videos
Completed Training
Displaying Dynamic Content in Silverlight using Expression Blend
Understanding and Managing Silverlight Resources with Expression Blend
Making Silverlight Objects Appear Transparent over HTML using Expression Blend
Creating a Template for a ScrollBar with Expression Blend
Customizing an Expression Encoder Template using Expression Blend
Creating Animated XAML Overlays for Expression Encoder using Expression Blend and Design
Customizing a Silverlight Template with Expression Blend
Customizing the Look of a Radio Button in Expression Blend
Customizing the Look of a Listbox in Expression Blend
Creating a Calculator with Expression Blend
Using Runtime Storyboarding in Expression Blend
Creating User Controls in Expression Blend
Reusing and Customizing User Controls in Expression Blend
Making a Slider Control in Expression Blend
Exploring XAML Layout Controls in Expression Blend
Using the Breadcrumb Trail in Expression Blend
Using Vertex Animation with Expression Blend
Using the Border Control in Expression Blend
Using the GridLayout Panel in Expression Blend
Using the Layout Stack Panel in Expression Blend
Using the Binding Scrollbar in Expression Blend
Creating Visual Transitions in Expression Blend
Use an In-State Animation To Make a Silverlight 2 Button Pulse While Focused
Customize The Check Mark In a Silverlight 2 CheckBox
Add States to a UserControl for Silverlight 2
Create Custom Buttons for Silverlight 2
Create and Edit Clipping Paths in Blend
Use the Key Spline Editor in Blend
Create the Wet Floor Effect in Expression Blend
Customize Expression Media Silverlight Templates Using Blend
Working with 3D Cameras in Expression Blend
Working With 3D Materials in Expression Blend
Importing and Manipulating 3D Objects in Expression Blend
Create User Controls in Expression Blend
Working With Clipping Paths in Expression Blend
Using an ObjectDataSource in Expression Blend
Creating a Control Template in Expression Blend
Introduction to Styles
Using Expression Design to Generate XAML Resources for Expression Blend
Motion Paths
Sharing Styles Among Heterogeneous Elements
Basic Animation
Timeline Interpolation
Working with the Grid Panel
Adding Video
Creating and Using an XMLDataSource
Create Data Templates
Creating and Using Brush Resources in Expression Blend
Introducing Blend and Working with Control Editing
Using Databinding with External Data
3D Animation and Event Triggers
Databinding to Control Properties
Designer and Developer Collaboration and Additional Demos


Beehive Game

Additional Expression Blend Training Videos
Download the assets, step-by-step guide, and video package (104 MB)
Completed Training
Organizing and Importing Assets into Expression Blend 3
Creating the BeeHive Game Interface Using Expression Blend 3
Understanding Layout Containers with Expression Blend 3
Creating a User Control with Expression Blend 3
Adding and Applying Behaviors with Expression Blend 3
Adding Game Walls and Creating Animation with Expression Blend 3
Animating Controls with the Visual State Manager with Expression Blend 3
Working with Text and Embedding Fonts with Expression Blend 3
Adding Audio Resources to a Silverlight Game with Expression Blend 3
Publishing and Testing Your Silverlight Game with Expression Blend 3

Well, once you have gone through all these videos you can probably call yourself trained in Application Design using Expression Studio, SilverLight and WPF.

With these skills expect to make between 40k (0-1 years experience) and 80k (5+ years experience).

10 Step process for developing a new WPF application the right way using C#

It makes a difference if you do something the right way from the beginning.  Everything seems to work out so much better and takes less time over all.

Here are some basic steps that I have learned will help you do it right the first time. These steps are from my experience, mostly because I did it wrong the first few times.  These are not exact steps. They are subject to change and improve.  In fact, you might have improvements to suggest immediately when you read this. But if you are new to WPF, then reading these steps before you start and following them, will have you closer it doing it the right way the first time.  It is much more pleasant to tweak a pretty good process than it is to go in with no idea for a process and do it wrong.

Step 1 – Prepare the idea

  1. Some one has an idea
  2. Determine the minimal features for release 1.
  3. Determine the minimal features for release 2.
    1. Alter minimal features for release 1 if it makes sense to do so.
  4. Determine the minimal features for release 3.
    1. Alter minimal features for release 1 and 2 if it makes sense to do so.

Step 2 – Design the Application’s back end business logic (simultaneous to Step 3)

  1. Design the backend
  2. Apply the “Keep it simple” idea to the business logic and makes changes as necessary.
  3. Apply the “Keep it secure” idea to the business logic and makes changes as necessary.
  4. Repeats steps 2 and 3 if necessary.
  5. Backend development can start now as the UI and the back end should not need to know about each other.

Step 3 – Design the UI using WPF (simultaneous to Step 2)

  1. Determine what development model should be used to separate the UI from the business logic.
    1. Model-View-ViewModel (MVVM) is the model I recommend for WPF.
    2. Gather libraries used for the model (such as common MVVM libraries that include the common ViewModelBase and RelayCommand objects)
  2. Consider using a 3rd party WPF control set will be used.  Many 3rd party companies provide WPF controls that are better and easier to use than those included by default.
    1. If you decided to use 3rd party controls, purchase or otherwise obtain the libraries for these 3rd party controls.
  3. Consider designing two WPF interfaces or skins (I will call these Views from here on out) for each screen. This will help drive the separation of the back end code from the WPF code. Also if developing two Views is not simple, it indicates a poor design.
  4. Design the interface(s) (you may be doing two Views) using SketchFlow (take time to include the libraries for the 3rd party WPF Controls in your SketchFlow project and design with them)
    1. SketchFlow allows you to design the UI, which is commonly done in paint, but instead does this in XAML, and is actually the WPF code your application will use.
  5. SketchFlow allows you to deliver the design (or both Views if you did two) as a package to the customer.
    1. Deliver it immediately and get feedback.
    2. Make changes suggested by the customer if in scope.
  6. Take time to make the XAML in SketchFlow production ready.
  7. Deliver the XAML to the customer again, to buy of that the design changes are proper.
    1. Make changes suggested by the customer if in scope.

Step 4 – Determine the delivery or install method

  1. Determine the delivery method.
  2. Determine when to develop the delivery method.
    1. The easier the application is, the longer you can wait to determine the installer or delivery method.
    2. The more complex the install or delivery method, the sooner this should be started.

Step 5 – Develop the business logic

  1. Develop the application designed in step 2.
  2. Get the application working without UI or silently. Note: Start the next step, Develop the UI, as soon as enough code is available here.

Step 6 – Develop the UI

  1. Start the UI project by copying the XAML from the SketchFlow document to your Visual Studio or Expression Blend project.
  2. Create a project for the ViewModel code and develop it to interact with the model and business logic using Binding.
  3. Remember to develop two Views for every UI screen as this will help, though not guarantee, that the the MVVM model was correctly used.

Step 7 – Consider a Macintosh version

Macintosh owns a significant market share.  Determine if this application needs to run on Macintosh as well. Sure, since we are running C# your options are limited to either rewriting in objective C and Coca, or using Mono with a MonoMac UI.  I recommend the latter.

Note: It is critical that the UI and business logic are separated to really make this successful.

  1. Completely ignore the WPF design and have Macintosh users users assist the design team in designing the new UI.  Macintosh’s have a different feel, and trying to convert the same UI is a mistake.
  2. Create the MonoMac UI project.
  3. Create a project similar to the ViewModel project in Windows, to link the UI to the business logic.

Step 8 – Consider a BSD/Linux/Unix (BLU) version

BLU (BSD/Linux/Unix) doesn’t exactly own a significant market share. However, it is still important to determine if this application needs to run on on BLU as well. Sure, since we are running C# your options are limited to either rewriting in C++, or using Mono with a GTK# or Forms UI.

  1. Completely ignore the WPF and Macintosh designs and have Linux users assist the design team in designing the new UI. Linux has a different feel, and trying to convert the same UI could be a mistake.
  2. Create the GTK# project.
  3. Create a project similar to the ViewModel project in Windows, to link the UI to the business logic.
  4. GTK# doesn’t support binding, but still keep the UI separate from the business logic as much as possible.

Step 9 – Develop the delivery method

Again, you may need to do this way sooner if the application is complex.

  1. Develop the install or delivery method.
  2. If you decided to deploy to Macintosh or BLU you may have to develop separate install or delivery methods for those platforms as well.

Step 10 – Deliver the finished Products

  1. Once finished, deliver this product.
  2. If you decided to create a Macintosh or BLU version, deliver them when ready as well.  It is OK and maybe preferred to deliver these at different times.