Archive for the ‘IDEs’ Category.

Using Expression Blend and Visual States for Image Swapping

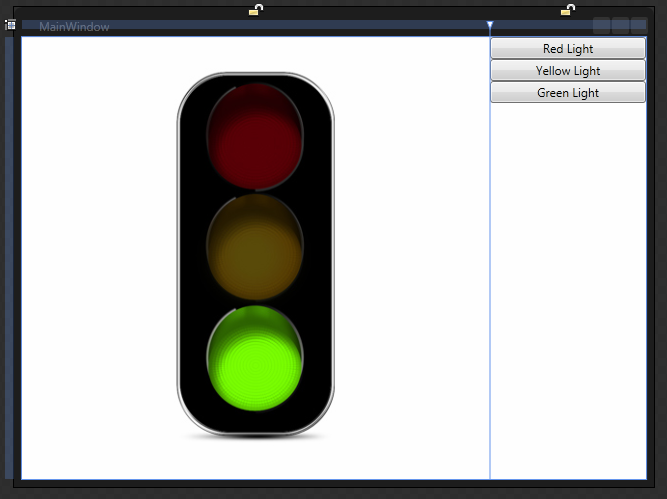
For this example, lets think of a stop light during the traffic of your morning commute. There will be three images of a stop light. Each image will have either the red, yellow, or green light on.

Link: I used traffic light images from here: http://www.psdgraphics.com/psd-icons/traffic-lights-icon-psd

*** This can be done 100% in Expression Blend without using any code at all. ***

Note: This is for both Developers and Designers. It is for designers because they can do all of this without code. It is for Developers because they need to know to not go reinvent the wheel and spend their time writing code to do this.

Step 1 – Create a new WPF Application project

You can do this in either Visual Studio or Expression Blend. For this example, we will use Expression Blend 4.

  1. Open Expression Blend 4.
  2. Go to File | New Project.
  3. Choose WPF Application.
  4. Name the project and click OK.
    Note: I named this project SwitchImagesWithVisualStates.

Step 2 – Add Images to the WPF project

  1. Right-click on your project and choose Add new folder.
  2. Name the folder Images.
  3. Open your file system and copy or drag your images to this new folder in Expression Blend.
    Note: If you copy the images using the windows file system, you may have to add the files to the project.

Step 3 – Design the View

We are going to have a simple view for this example with the images on the left and buttons on the right.

  1. Open MainWindow.xaml.
  2. Add a column to the default Grid, so there are two columns.
  3. Make the columns 3* and 1*. This will make the left column 75% and the right column 25% of the Grid size.
  4. Add all thee images to the left column.
  5. Remove any margins, heights or widths, and vertical or horizontal alignments from the images.
    Note: This is important so the images are always in the same place.
    Note: This assumes that all three of your images are identically sized and properly placed.
  6. Name each Image: ImageRedLight, ImageYellowLight, ImageGreenLight.
  7. Add a StackPanel to the right column.
  8. Remove any margins, heights or widths, and vertical or horizontal alignments from the StackPanel.
  9. Click to select the StackPanel in the Objects and Timeline box.
  10. Add three buttons to the StackPanel in the right column.
  11. Remove any margins, heights or widths, and vertical or horizontal alignments from the buttons.
  12. Name each button: ButtonRedLight, ButtonYellowLight, ButtonGreenLight.
Your View should now look like this in the Expresion Blend designer.

Your Xaml should look like this:

<Window
	xmlns="http://schemas.microsoft.com/winfx/2006/xaml/presentation"
	xmlns:x="http://schemas.microsoft.com/winfx/2006/xaml"
	x:Class="SwitchImagesWithVisualStates.MainWindow"
	x:Name="Window"
	Title="MainWindow"
	Width="640" Height="480">
	<Grid x:Name="LayoutRoot">
		<Grid.ColumnDefinitions>
			<ColumnDefinition Width="3*"/>
			<ColumnDefinition Width="1*"/>
		</Grid.ColumnDefinitions>
		<Image Name="ImageRedLight" Source="Images/Red.png" />
		<Image Name="ImageYellowLight" Source="Images/Yellow.png" />
		<Image Name="ImageGreenLight" Source="Images/Green.png" />
		<StackPanel Grid.Column="1">
			<Button Name="ButtonRedLight" Content="Red Light"/>
			<Button Name="ButtonYellowLight" Content="Yellow Light"/>
			<Button Name="ButtonGreenLight" Content="Green Light"/>
		</StackPanel>
	</Grid>
</Window>

Step 4 – Add VisualStates in a VisualStateGroup

  1. In Expression Studio, click on the States tab.
    Note: Sometimes the States tab is hard to find.
  2. On the top right of the States tab, click icon that has a + sign to add a VisualStateGroup.
  3. Name the VisualStateGroup.
    Note: I named mine VisualStateGroupTrafficLights.
  4. Under the VisualStateGroup you now have another icon with a + sign (the Add state icon) that add a VisualState to the VisualStateGroup. Click it three times to add three VisualStates.
  5. Name the VisualStates: VisualStateRedLight, VisualStateYellowLight, VisualStateGreenLight.

Step 5 – Set new values for each VisualState

  1. Configure the VisualStateRedLight.
    1. Click on VisualStateRedLight.
    2. You will see a red outline around the designer and the words: VisualStateRedLight state recording is on.
    3. In the Objects and Timeline tab, press and hold control and click to select both ImageYellowLight and ImageGreenLight.
    4. Go to the Properties tab.
    5. Change the visibility of the images to Hidden.
  2. Configure the VisualStateYellowLight.
    1. Click on VisualStateYellowLight.
    2. You will see a red outline around the designer and the words: VisualStateYellowLight state recording is on.
    3. In the Objects and Timeline tab, press and hold control and click to select both ImageRedLight and ImageGreenLight.
    4. Go to the Properties tab.
    5. Change the visibility of the images to Hidden.
  3. Configure the VisualStateGreenLight.
    1. Click on VisualStateGreenLight.
    2. You will see a red outline around the designer and the words: VisualStateGreenLight state recording is on.
    3. In the Objects and Timeline tab, press and hold control and click to select both ImageRedLight and ImageYellowLight.
    4. Go to the Properties tab.
    5. Change the visibility of the images to Hidden.

Step 6 – Configure each Button to switch to a VisualState on click

  1. Configure ButtonRedLight.
    1. In Assets, search for GoToStateAction.
    2. Click and drag the GoToStateAction and drop it in the designer over the ButtonRedLight.
    3. Go to Properties.
    4. Name it GoToRedLightState.
    5. Set the StateName to VisualStateRedLight.
  2. Configure ButtonYellowLight.
    1. In Assets, search for GoToStateAction.
    2. Click and drag the GoToStateAction and drop it in the designer over the ButtonYellowLight.
    3. Go to Properties.
    4. Name it GoToYellowLightState.
    5. Set the StateName to VisualStateYellowLight.
  3. Configure ButtonGeenLight.
    1. In Assets, search for GoToStateAction.
    2. Click and drag the GoToStateAction and drop it in the designer over the ButtonGreenLight.
    3. Go to Properties.
    4. Name it GoToGreenLightState.
    5. Set the StateName to VisualStateGreenLight.

That is it. You have now written an application that switches the image.

Here is your final Xaml.

<Window
	xmlns="http://schemas.microsoft.com/winfx/2006/xaml/presentation"
	xmlns:x="http://schemas.microsoft.com/winfx/2006/xaml"
	xmlns:i="http://schemas.microsoft.com/expression/2010/interactivity"
	xmlns:ei="http://schemas.microsoft.com/expression/2010/interactions"
	x:Class="SwitchImagesWithVisualStates.MainWindow"
	x:Name="Window"
	Title="MainWindow"
	Width="640" Height="480">
	<Grid x:Name="LayoutRoot">
		<VisualStateManager.VisualStateGroups>
			<VisualStateGroup x:Name="VisualStateGroupTrafficLights">
				<VisualState x:Name="VisualStateRedLight">
					<Storyboard>
						<ObjectAnimationUsingKeyFrames Storyboard.TargetProperty="(UIElement.Visibility)" Storyboard.TargetName="ImageYellowLight">
							<DiscreteObjectKeyFrame KeyTime="0" Value="{x:Static Visibility.Hidden}"/>
						</ObjectAnimationUsingKeyFrames>
						<ObjectAnimationUsingKeyFrames Storyboard.TargetProperty="(UIElement.Visibility)" Storyboard.TargetName="ImageGreenLight">
							<DiscreteObjectKeyFrame KeyTime="0" Value="{x:Static Visibility.Hidden}"/>
						</ObjectAnimationUsingKeyFrames>
					</Storyboard>
				</VisualState>
				<VisualState x:Name="VisualStateYellowLight">
					<Storyboard>
						<ObjectAnimationUsingKeyFrames Storyboard.TargetProperty="(UIElement.Visibility)" Storyboard.TargetName="ImageRedLight">
							<DiscreteObjectKeyFrame KeyTime="0" Value="{x:Static Visibility.Hidden}"/>
						</ObjectAnimationUsingKeyFrames>
						<ObjectAnimationUsingKeyFrames Storyboard.TargetProperty="(UIElement.Visibility)" Storyboard.TargetName="ImageGreenLight">
							<DiscreteObjectKeyFrame KeyTime="0" Value="{x:Static Visibility.Hidden}"/>
						</ObjectAnimationUsingKeyFrames>
					</Storyboard>
				</VisualState>
				<VisualState x:Name="VisualStateGreenLight">
					<Storyboard>
						<ObjectAnimationUsingKeyFrames Storyboard.TargetProperty="(UIElement.Visibility)" Storyboard.TargetName="ImageRedLight">
							<DiscreteObjectKeyFrame KeyTime="0" Value="{x:Static Visibility.Hidden}"/>
						</ObjectAnimationUsingKeyFrames>
						<ObjectAnimationUsingKeyFrames Storyboard.TargetProperty="(UIElement.Visibility)" Storyboard.TargetName="ImageYellowLight">
							<DiscreteObjectKeyFrame KeyTime="0" Value="{x:Static Visibility.Hidden}"/>
						</ObjectAnimationUsingKeyFrames>
					</Storyboard>
				</VisualState>
			</VisualStateGroup>
		</VisualStateManager.VisualStateGroups>
		<Grid.ColumnDefinitions>
			<ColumnDefinition Width="3*"/>
			<ColumnDefinition Width="1*"/>
		</Grid.ColumnDefinitions>
		<Image x:Name="ImageRedLight" Source="Images/Red.png" />
		<Image x:Name="ImageYellowLight" Source="Images/Yellow.png" />
		<Image x:Name="ImageGreenLight" Source="Images/Green.png" />
		<StackPanel Grid.Column="1">
			<Button x:Name="ButtonRedLight" Content="Red Light">
				<i:Interaction.Triggers>
					<i:EventTrigger EventName="Click">
						<ei:GoToStateAction x:Name="GoToRedLightState" StateName="VisualStateRedLight"/>
					</i:EventTrigger>
				</i:Interaction.Triggers>
			</Button>
			<Button x:Name="ButtonYellowLight" Content="Yellow Light">
				<i:Interaction.Triggers>
					<i:EventTrigger EventName="Click">
						<ei:GoToStateAction x:Name="GoToYellowLightState" StateName="VisualStateYellowLight"/>
					</i:EventTrigger>
				</i:Interaction.Triggers>
			</Button>
			<Button x:Name="ButtonGreenLight" Content="Green Light">
				<i:Interaction.Triggers>
					<i:EventTrigger EventName="Click">
						<ei:GoToStateAction x:Name="GoToGreenLightState" StateName="VisualStateGreenLight"/>
					</i:EventTrigger>
				</i:Interaction.Triggers>
			</Button>
		</StackPanel>
	</Grid>
</Window>

Notice there are additional dependencies added that come from System.Windows.Interactivity.dll:

  1. xmlns:i=”http://schemas.microsoft.com/expression/2010/interactivity”
  2. Mli>xmlns:ei=”http://schemas.microsoft.com/expression/2010/interactions”

There is a lot more to learn. We didn’t even touch Transition or Easing methods. We didn’t discuss how to hook this up into a full application, or possible an MVVM application.
How to find and remove unused references in a C# project

Often  your projects is created with default references, some of which you will never use. Sometime you add a reference but then end up not using it. Over time you may have over a dozen references in each of a dozen projects and you know you are not using half of them.

I know two tools that will resolve this. One if free and is a plugin only for this feature. The other is a commercial product and has hundred of features.

Remove Unused References – Free Tool

I prefer the free tool by far as it is a simple and easy to use Visual Studio plugin. So I will test it first.

Remove Unused References

Click the link and it download and installs in seconds.

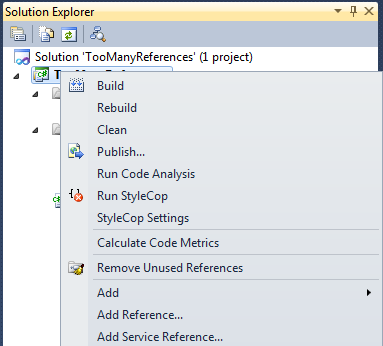
Then you will see the feature when you right-click on a project in Visual Studio.

Click it and it will remove any references that are not actually being used.

Ok, now lets create a sample project and see if this will work.

I am created a new Console Application and added the following code to the Program.cs

using System;
using System.Data;

namespace TooManyReferences
{
    class Program
    {
        static void Main(string[] args)
        {
            // I need System, System.Data, and System.Xml
            DataTable table = new DataTable();
            table.Columns.Add(new DataColumn("FistName",typeof(String)));
            table.Columns.Add(new DataColumn("LastName", typeof(String)));
            DataRow row = table.NewRow();
            row["FirstName"] = "Jared";
            row["LastName"] = "Barneck";
            table.Rows.Add(row);
            Console.WriteLine(table.Rows[0]);
        }
    }
}

Now lets right-click on the project and choose Remove Unused References.

Unfortunately, my expectation were not met.

Expectatation

The following reference should remain:

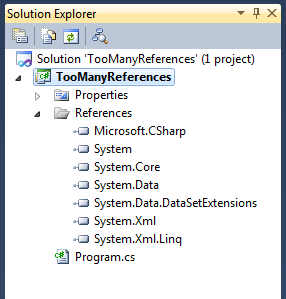
  • System
  • System.Data
  • System.XML

My project should build.

Actual Result

The following references remained:

  • System.Data

My project failed to build with the following errors

Error 1 The type 'System.Xml.Serialization.IXmlSerializable' is defined in an assembly that is not referenced. You must add a reference to assembly 'System.Xml, Version=4.0.0.0, Culture=neutral, PublicKeyToken=b77a5c561934e089'. C:\Users\212070783\Documents\Visual Studio 2010\Projects\TooManyReferences\TooManyReferences\Program.cs 11 13 TooManyReferences
Error 2 The type 'System.ComponentModel.ISupportInitialize' is defined in an assembly that is not referenced. You must add a reference to assembly 'System, Version=4.0.0.0, Culture=neutral, PublicKeyToken=b77a5c561934e089'. C:\Users\212070783\Documents\Visual Studio 2010\Projects\TooManyReferences\TooManyReferences\Program.cs 11 13 TooManyReferences
Error 3 The type 'System.ComponentModel.ISupportInitializeNotification' is defined in an assembly that is not referenced. You must add a reference to assembly 'System, Version=4.0.0.0, Culture=neutral, PublicKeyToken=b77a5c561934e089'. C:\Users\212070783\Documents\Visual Studio 2010\Projects\TooManyReferences\TooManyReferences\Program.cs 11 13 TooManyReferences
Error 4 The type 'System.ComponentModel.IListSource' is defined in an assembly that is not referenced. You must add a reference to assembly 'System, Version=4.0.0.0, Culture=neutral, PublicKeyToken=b77a5c561934e089'. C:\Users\212070783\Documents\Visual Studio 2010\Projects\TooManyReferences\TooManyReferences\Program.cs 11 13 TooManyReferences
Error 5 The type 'System.ComponentModel.MarshalByValueComponent' is defined in an assembly that is not referenced. You must add a reference to assembly 'System, Version=4.0.0.0, Culture=neutral, PublicKeyToken=b77a5c561934e089'. C:\Users\212070783\Documents\Visual Studio 2010\Projects\TooManyReferences\TooManyReferences\Program.cs 11 13 TooManyReferences

Note: Remember TooManyReferences is the name of my sample project and that is actually confusing in the log.

Conclusion

This tool removes references it should not remove.

If you use this tool, try using it on one project at a time in a large solution, otherwise you could get overwhelmed with failures.

It is pretty easy to add back references, so it is usable, but if it could be taken one step further, to resolve the references needed by objects my code uses, then it would probably be the best and simplest tool out there for this.

Bug Submitted

Remove Unused References – Commerical Tool

Resharper is the commercial tool that solves this problem. Unfortunately it is not free. However, it works well and I don’t currently have a license, but remember that it did not remove needed references when I last used it. Here is a link for more information.

http://www.jetbrains.com/resharper/webhelp/Refactorings__Remove_Unused_References.html

Visual Studio Training Videos – A check list of videos from WindowsClient.net

WPF in Visual Studio Training Videos


Overview

WPF – Getting Started

WPF – Design, Layout, Styles, T

WPF – Advanced

3D, Animation, Video, Sound

All Videos


Sheet 1: WPF – Getting Started

WPF – Getting Started and more
Completed Introduction Videos
Your First WPF Application 08 min 33 sec Getting Started
How Do I: Create a Simple Data Entry Form in WPF 24 min 32 sec Getting Started
How Do I: Create a Splash Screen in WPF 14 min Getting Started
How Do I: Define and Use Namespaces in WPF 23 min 16 sec Getting Started
How to Create a WPF Application 10 min 19 sec Getting Started

Accessing Command Line Parameters 06 min 13 sec Code
Reflections in Visual Studio and Blend 14 min 11 sec Code
Control When Bound Data is Updated 19 min 33 sec Binding
How Do I: Build a ValueConverter to Format Bound Data in WPF 17 min 17 sec Binding
How Do I: Create and Use a Converter to Change DataTypes 19 min 23 sec Binding
How Do I: Use FallbackValue in WPF Binding 09 min 38 sec Binding
How Do I: Use TargetNullValue to Handle Nullable Types in WPF Binding 10 min 44 sec Binding
How Do I: Using StringFormat when Multibinding 11 min Binding
How Do I: Visually Indicate Binding Error Status 12 min 16 sec Binding

How to Use XAML in WPF 10 min 34 sec XAML
Create and Browse Loose XAML Files 08 min 20 sec XAML
Extend Control Functionality Using XAML Attached Properties 23 min 47 sec XAML
How Do I: Use Attached Properties to Store Extra Data in WPF 17 min 16 sec XAML
How Do I: Using Path Markup Language to Define a Path 21 min 9 sec XAML
Create User Controls in WPF 12 min 43 sec Controls
How Do I: Build an Asynchronous Progress Bar in WPF 24 min 48 sec Controls
How Do I: Create a Simple WPF DataGrid to Edit Tabular Data 31 min 3 sec Controls
How Do I: Create Lookup Combobox in WPF 23 min 43 sec Controls
How Do I: Display Data in a List in WPF 11 min 47 sec Controls
How Do I: Use the WebBrowser Control in WPF 21 min 25 sec Controls
How to Create a User Control in WPF 11 min 38 sec Controls
Introducing the WPF 4 Calendar Control 17 min 49 sec Controls
Using Alternating Rows in an ItemsControl 14 min 54 sec Controls
Working With Context Menus in WPF 13 min 5 sec Controls
Creating Navigation Applications in WPF 11 min 45 sec Navigation
Passing Data Between Pages In Navigation Based Applications 08 min 55 sec Navigation
Use the Page Functions to Retrieve Data and Pass it Back to a Previous Page 12 min 22 sec Navigation
WPF Navigation Application 11 min 33 sec Navigation
Deploying a Standard WPF Application Using ClickOnce and Visual Studio 16 min 47 sec Deploy
Host a WPF Control in a Win32 Application 19 min 59 sec Integration
How Do I: Use a WPF Control in a Windows Form using ElementHost 06 min 52 sec Integration
How Do I: WinForms WPF Integration 11 min Integration
Creating and Consuming Resource Dictionaries in WPF and Silverlight 13 min 9 sec Resource Dictionaries
How Do I: Use Resource Files for Localization both in XAML and Code 25 min 16 sec Localization

Sheet 2: WPF – Design, Layout, Styles, T

WPF – Design, Layout, Styles, Templates
Completed Introduction Videos
How to Layout a WPF Application 14 min 5 sec Design
Layout Techniques for Windows Forms Developers 20 min 19 sec Design
Create Gadget Style Windows in WPF 07 min 37 sec Design
Create WPF Master – Detail UI Using Data Sources Window Object DataSource 25 min 24 sec Design
Grid Control Design-Time Row and Column Manipulation Features 05 min 40 sec Design
How Do I: Add Design Time Data to a Control 13 min 48 sec Design
How Do I: Create a Master-Detail Data Entry Form in WPF 24 min 58 sec Design
How Do I: Detect Designmode in a Usercontrol 10 min 26 sec Design
Apply Styles in WPF 12 min 40 sec Style
How Do I: Change the Appearance of Grouped Data Using Styles 18 min 40 sec Style
How Do I: Customize the Appearance of a ListBox in WPF 16 min 16 sec Style
How Do I: Customize the Appearance of ListBox ListItems in WPF 15 min 2 sec Style
How Do I: Use ResourceDictionary Elements Exported from Expression Design 2 19 min 3 sec Style
How to Use Styles in WPF 10 min 22 sec Style
Introduction to Themes in WPF 15 min 14 sec Style
Override a Style for a Local Control’s Property Value in WPF 12 min 34 sec Style
Sharing Styles Among Heterogeneous Elements 21 min 31 sec Style
Skinning a WPF Application 21 min 31 sec Style
Style Inheritance using BasedOn in WPF 17 min 28 sec Style
How to Apply Control Templates in WPF 12 min 24 sec Templates
How to Use Data Templates in WPF 14 min 59 sec Templates
Use a Control Template to Define a Desired Look 16 min 34 sec Templates
How Do I: Use Windows 7 Text-to-Speech from .NET 4 and WPF 20 min 36 sec Text-to-speech

Sheet 3: WPF – Advanced

WPF – Advanced
Completed Introduction Videos
How Do I: Create a Custom Command in WPF 18 min 06 sec Commands
How Do I: Use Command Binding in WPF 24 min 18 sec Commands

Create Dependency Properties in WPF 21 min 23 sec Dependency Properties
How Do I: Build Data-driven WPF Application using the MVVM pattern 47 min 23 sec MVVM
How Do I: Use ASP.NET Membership Provider for WPF Authentication 25 min 04 sec ASP.NET
Complex Logic Using Triggers in WPF 13 min 36 sec Triggers
Implementing Data Triggers in WPF 10 min 25 sec Triggers
Implementing Property Triggers in WPF 13 min 2 sec Triggers
Interactivity Through Triggers in WPF Control Templates 15 min 26 sec Triggers
How Do I: Implement Windows 7 Taskbar Icon Overlays with WPF 4 13 min 21 sec Taskbar integration
How do I: Use Windows 7 Taskbar Progress Reporting from WPF 4 10 min 45 sec Taskbar integration
How Do I: Associate a Validation Rule with a Binding 16 min 53 sec Validation
How Do I: Control Item Activation By Data Validation? 24 min 43 sec Validation
How Do I: Create a Custom Binding Validator 20 min Validation
How Do I: Hook Up and Display Validation in WPF 22 min 20 sec Validation
How Do I: Setting and Clearing Validation Errors in code 14 min 18 sec Validation
Adding Annotations to Flow Documents 04 min 35 sec ??
How to Use Isolated Storage 10 min 38 sec ??
How Do I: Retrieve XML Data From the Server in an XBAP Application 12 min 36 sec Service
How to Consume a Data Service in WPF 13 min 6 sec Service

How Do I: Use CollectionViews to Sort and Filter Data 24 min 23 sec Sort/Filter

Sheet 4: 3D, Animation, Video, Sound

WPF – 3D, Animation, Video, Sound
Completed Introduction Videos
How Do I: Apply Textures to a 3D object 24 min 22 sec 3D
How Do I: Create Custom Pixel Shader Effects for WPF 28 min 41 sec 3D
How Do I: Get Started with 3D Elements in WPF 31 min 39 sec 3D
How Do I: Work with Lighting in WPF 3D 20 min 26 sec 3D

Basic Animation in WPF Using XAML 19 min 26 sec Animation
Build a Custom GridLength Animation 20 min 18 sec Animation
Confine Animation to a Path 12 min 43 sec Animation
How Do I: Animate an Effect in WPF? 17 min 52 sec Animation
How Do I: Create a Dynamic Storyboard in WPF 20 min 8 sec Animation
How Do I: Use PointAnimation to Animate a Path in WPF 14 min 22 sec Animation
Kerning XAML Animations in WPF 16 min 18 sec Animation
How Do I: Add Sound to a WPF Application 17 min 48 sec Sound
Responding to Events with SoundPlayerAction 15 min 37 sec Sound
How Do I: Custom Easing Functions in WPF 4 16 min 49 sec Easing
Introduction to Easing Functions in WPF 4 15 min 23 sec Easing
Ink Basics in WPF 09 min 53 sec ??
Use PathGeometries in WPF 20 min 32 sec ??
Building a Client Profile Deployment for photoSuru 09 min 53 sec ??
Control Video Playback in WPF 14 min 36 sec Video
How Do I: Paint with Video in WPF 16 min 58 sec Video
How Do I: Use Video in WPF Applications 15 min 12 sec Video
Windows 7 Sensor and Location API Part 2 – Accelerometer as a Joystick 21 min 38 sec Gaming

Sheet 5: All Videos

WPF – All Videos
Completed Complete list of videos
Create WPF Master – Detail UI Using Data Sources Window Object DataSource 25 min 24 sec Design
Layout Techniques for Windows Forms Developers 20 min 19 sec Design
Grid Control Design-Time Row and Column Manipulation Features 05 min 40 sec Design
Creating and Consuming Resource Dictionaries in WPF and Silverlight 13 min 9 sec Resource Dictionaries
How Do I: Build My First WPF Application 32 min 40 sec Getting Started
How Do I: Setting and Clearing Validation Errors in code 14 min 18 sec Validation
How Do I: Build Data-driven WPF Application using the MVVM pattern 47 min 23 sec MVVM
How Do I: Use TargetNullValue to Handle Nullable Types in WPF Binding 10 min 44 sec Binding
How Do I: Using StringFormat when Multibinding 11 min Binding
How Do I: Use FallbackValue in WPF Binding 09 min 38 sec Binding
Windows 7 Sensor and Location API Part 2 – Accelerometer as a Joystick 21 min 38 sec Gaming
How Do I: Implement Windows 7 Taskbar Icon Overlays with WPF 4 13 min 21 sec Taskbar integration
How Do I: Use Windows 7 Text-to-Speech from .NET 4 and WPF 20 min 36 sec Integration
How Do I: Change the Appearance of Grouped Data Using Styles 18 min 40 sec Style
How Do I: Apply Textures to a 3D object 24 min 22 sec 3D
How Do I: WinForms WPF Integration 11 min Integration
How Do I: Use Resource Files for Localization both in XAML and Code 25 min 16 sec Localization
How do I: Use Windows 7 Taskbar Progress Reporting from WPF 4 10 min 45 sec Taskbar integration
How Do I: Create Custom Pixel Shader Effects for WPF 28 min 41 sec 3D
How Do I: Work with Lighting in WPF 3D 20 min 26 sec 3D
How Do I: Get Started with 3D Elements in WPF 31 min 39 sec 3D
How Do I: Use ASP.NET Membership Provider for WPF Authentication 25 min 04 sec ASP.NET
How Do I: Use a WPF Control in a Windows Form using ElementHost 06 min 52 sec Integration
How Do I: Create a Custom Command in WPF 18 min 06 sec Commands
How Do I: Custom Easing Functions in WPF 4 16 min 49 sec Easing
Introduction to Easing Functions in WPF 4 15 min 23 sec Easing
Introducing the WPF 4 Calendar Control 17 min 49 sec Controls
How Do I: Use Command Binding in WPF 24 min 18 sec Commands
How Do I: Use CollectionViews to Sort and Filter Data 24 min 23 sec Sort/Filter
How Do I: Control Item Activation By Data Validation? 24 min 43 sec Validation
How Do I: Animate an Effect in WPF? 17 min 52 sec Animation
Building a Client Profile Deployment for photoSuru 09 min 53 sec ??
How Do I: Visually Indicate Binding Error Status 12 min 16 sec Binding
How Do I: Create a Custom Binding Validator 20 min Validation
How Do I: Associate a Validation Rule with a Binding 16 min 53 sec Validation
How Do I: Add Design Time Data to a Control 13 min 48 sec Design
How Do I: Detect Designmode in a Usercontrol 10 min 26 sec Design
Using Alternating Rows in an ItemsControl 14 min 54 sec Controls
Control When Bound Data is Updated 19 min 33 sec Binding
Working With Context Menus in WPF 13 min 5 sec Controls
How Do I: Use the WebBrowser Control in WPF 21 min 25 sec Controls
Adding Annotations to Flow Documents 04 min 35 sec ??
How Do I: Create a Splash Screen in WPF 14 min Getting Started
How Do I: Create a Simple WPF DataGrid to Edit Tabular Data 31 min 3 sec Controls
How Do I: Create a Master-Detail Data Entry Form in WPF 24 min 58 sec Design
How to Use Styles in WPF 10 min 22 sec Style
How to Create a User Control in WPF 11 min 38 sec Controls
How to Create a WPF Application 10 min 19 sec Getting Started
How to Apply Control Templates in WPF 12 min 24 sec Templates
How to Consume a Data Service in WPF 13 min 6 sec Service
How to Use Data Templates in WPF 14 min 59 sec Templates
How to Layout a WPF Application 14 min 5 sec Design
How to Use XAML in WPF 10 min 34 sec XAML
Control Video Playback in WPF 14 min 36 sec Video
Build a Custom GridLength Animation 20 min 18 sec Animation
How Do I: Create a Dynamic Storyboard in WPF 20 min 8 sec Animation
How Do I: Build an Asynchronous Progress Bar in WPF 24 min 48 sec Controls
How Do I: Use Video in WPF Applications 15 min 12 sec Video
How Do I: Paint with Video in WPF 16 min 58 sec Video
How Do I: Hook Up and Display Validation in WPF 22 min 20 sec Validation
How Do I: Create Lookup Combobox in WPF 23 min 43 sec Controls
Responding to Events with SoundPlayerAction 15 min 37 sec Sound
How Do I: Add Sound to a WPF Application 17 min 48 sec Sound
How Do I: Display Data in a List in WPF 11 min 47 sec Controls
How Do I: Create a Simple Data Entry Form in WPF 24 min 32 sec Getting Started
How Do I: Use ResourceDictionary Elements Exported from Expression Design 2 19 min 3 sec Style
Extend Control Functionality Using XAML Attached Properties 23 min 47 sec XAML
How Do I: Use Attached Properties to Store Extra Data in WPF 17 min 16 sec XAML
How Do I: Define and Use Namespaces in WPF 23 min 16 sec Getting Started
How Do I: Customize the Appearance of a ListBox in WPF 16 min 16 sec Style
How Do I: Customize the Appearance of ListBox ListItems in WPF 15 min 2 sec Style
How Do I: Create and Use a Converter to Change DataTypes 19 min 23 sec Binding
How Do I: Build a ValueConverter to Format Bound Data in WPF 17 min 17 sec Binding
How Do I: Use PointAnimation to Animate a Path in WPF 14 min 22 sec Animation
How Do I: Retrieve XML Data From the Server in an XBAP Application 12 min 36 sec Service
How Do I: Using Path Markup Language to Define a Path 21 min 9 sec XAML
Create Dependency Properties in WPF 21 min 23 sec Getting Started
Use PathGeometries in WPF 20 min 32 sec ??
Ink Basics in WPF 09 min 53 sec ??
Confine Animation to a Path 12 min 43 sec Animation
Skinning a WPF Application 21 min 31 sec Style
Use a Control Template to Define a Desired Look 16 min 34 sec Templates
Create User Controls in WPF 12 min 43 sec Controls
Sharing Styles Among Heterogeneous Elements 21 min 31 sec Style
Override a Style for a Local Control’s Property Value in WPF 12 min 34 sec Style
Host a WPF Control in a Win32 Application 19 min 59 sec Integration
Interactivity Through Triggers in WPF Control Templates 15 min 26 sec Triggers
Kerning XAML Animations in WPF 16 min 18 sec Animation
Implementing Data Triggers in WPF 10 min 25 sec Triggers
Complex Logic Using Triggers in WPF 13 min 36 sec Triggers
Basic Animation in WPF Using XAML 19 min 26 sec Animation
Introduction to Themes in WPF 15 min 14 sec Style
Implementing Property Triggers in WPF 13 min 2 sec Triggers
Style Inheritance using BasedOn in WPF 17 min 28 sec Style
Apply Styles in WPF 12 min 40 sec Style
Deploying a Standard WPF Application Using ClickOnce and Visual Studio 16 min 47 sec Deploy
Create and Browse Loose XAML Files 08 min 20 sec XAML
Use the Page Functions to Retrieve Data and Pass it Back to a Previous Page 12 min 22 sec Navigation
Passing Data Between Pages In Navigation Based Applications 08 min 55 sec Navigation
WPF Navigation Application 11 min 33 sec Navigation
Create Gadget Style Windows in WPF 07 min 37 sec Design
Accessing Command Line Parameters 06 min 13 sec Code
How to Use Isolated Storage 10 min 38 sec ??
Build a Standard WPF Application 08 min 25 sec Getting Started
Creating Navigation Applications in WPF 11 min 45 sec Navigation
Reflections in Visual Studio and Blend 14 min 11 sec Code

How to load a ResourceDictionary at Design Time in WPF

I am including my ResourceDictionary files as Content files. Content files means they are not compiled or embedded, but they are loose files on disk.

One issue I need to solve was how to have the Design View in Expression Blend or Visual Studio.

It seems that Expression Blend has a partial solution but it doesn’t work in Visual Studio for me.

Steps for loading a ResourceDictionary from a loose file at design time

  1. Locate your .proj file for your WPF Project.
  2. Edit the .proj file with you favorite text editor.
    Note: I use Notepad++.
  3. Find the ResourceDictionary file that is included as content.
        <Content Include="Resources\en-US\Common.View.LocalizationResources.en-US.xaml">
          <Generator>MSBuild:Compile</Generator>
          <SubType>Designer</SubType>
          <CopyToOutputDirectory>PreserveNewest</CopyToOutputDirectory>
        </Content>
    
  4. Change it to this:
        <Content Include="Resources\en-US\Common.View.LocalizationResources.en-US.xaml"
          Condition="'$(DesignTime)'=='true'
          OR ('$(SolutionPath)'!='' AND Exists('$(SolutionPath)')
          AND '$(BuildingInsideVisualStudio)'!='true'
          AND '$(BuildingInsideExpressionBlend)'!='true')">
          <Generator>MSBuild:Compile</Generator>
          <SubType>Designer</SubType>
          <CopyToOutputDirectory>PreserveNewest</CopyToOutputDirectory>
        </Content>
    
  5. Save and close the file.


Loading multiple ResourceDictionary files at design time

Sometimes Expression Blend will prompt you when it can’t find a resource and it will do this for you. However, it does something interesting.

It adds a file called DesignTimeResources.xaml in the Properties folder as a Page (not as Content).

    <Page Include="Properties\DesignTimeResources.xaml" 
      Condition="'$(DesignTime)'=='true' 
      OR ('$(SolutionPath)'!='' 
      AND Exists('$(SolutionPath)') AND '$(BuildingInsideVisualStudio)'!='true' 
      AND '$(BuildingInsideExpressionBlend)'!='true')">
      <Generator>MSBuild:Compile</Generator>
      <SubType>Designer</SubType>
      <ContainsDesignTimeResources>true</ContainsDesignTimeResources>
    </Page>

The file then looks as follows:

<ResourceDictionary
    xmlns="http://schemas.microsoft.com/winfx/2006/xaml/presentation" 
    xmlns:x="http://schemas.microsoft.com/winfx/2006/xaml">
    <ResourceDictionary.MergedDictionaries>        
        <ResourceDictionary Source="E:\Dev\LD\Trunk\install\Common\LANDesk.Install.Common\Resources\en-US\Common.LocalizationResources.en-US.xaml"/>
    </ResourceDictionary.MergedDictionaries>
    <!-- Resource dictionary entries should be defined here. -->
</ResourceDictionary>

And then you can add more ResourceDictionaries without modifying the .proj file.

<ResourceDictionary
    xmlns="http://schemas.microsoft.com/winfx/2006/xaml/presentation" 
    xmlns:x="http://schemas.microsoft.com/winfx/2006/xaml">
    <ResourceDictionary.MergedDictionaries>
        <ResourceDictionary Source="E:\Dev\LD\Trunk\install\SomeApp\Branding\StyleResources.xaml"/>
        <ResourceDictionary Source="E:\Dev\LD\Trunk\install\SomeApp\Branding\AlternateStyleResources.xaml"/>
        <ResourceDictionary Source="E:\Dev\LD\Trunk\install\SomeApp\Resources\en-US\en-US.xaml"/>
    </ResourceDictionary.MergedDictionaries>
    <!-- Resource dictionary entries should be defined here. -->
</ResourceDictionary>

ResourceDictionary with Relative Paths

Of course relative paths are more desired than static paths, especially when using projects among multiple people and from source control.

<ResourceDictionary
    xmlns="http://schemas.microsoft.com/winfx/2006/xaml/presentation" 
    xmlns:x="http://schemas.microsoft.com/winfx/2006/xaml">
    <ResourceDictionary.MergedDictionaries>
        <ResourceDictionary Source="..\Branding\StyleResources.xaml"/>
        <ResourceDictionary Source="..\Branding\AlternateStyleResources.xaml"/>
        <ResourceDictionary Source="..\Resources\en-US\en-US.xaml"/>
    </ResourceDictionary.MergedDictionaries>
    <!-- Resource dictionary entries should be defined here. -->
</ResourceDictionary>

Resources:
http://www.tweened.org/en/2010/06/07/design-time-resources-dans-blend-4/

A snippet for Properties in a ViewModel

If you are using MVVM you probably should create a snippet very similar to the following to save time.

C:\Program Files (x86)\Microsoft Visual Studio 10.0\VC#\Snippets\1033\Visual C#\propvm.snippet

<?xml version="1.0" encoding="utf-8" ?>
<CodeSnippets  xmlns="http://schemas.microsoft.com/VisualStudio/2005/CodeSnippet">
	<CodeSnippet Format="1.0.0">
		<Header>
			<Title>propvm</Title>
			<Shortcut>propvm</Shortcut>
			<Description>Code snippet for property and backing field for a ViewModel that calls NotifyPropertyChanged.</Description>
			<Author>Jared Barneck</Author>
			<SnippetTypes>
				<SnippetType>Expansion</SnippetType>
			</SnippetTypes>
		</Header>
		<Snippet>
			<Declarations>
				<Literal>
					<ID>type</ID>
					<ToolTip>Property type</ToolTip>
					<Default>int</Default>
				</Literal>
				<Literal>
					<ID>property</ID>
					<ToolTip>Property name</ToolTip>
					<Default>MyProperty</Default>
				</Literal>
			</Declarations>
			<Code Language="csharp"><![CDATA[public $type$ $property$
	{
		get { return _$property$;}
		set 
		{ 
			_$property$ = value;
			NotifyPropertyChanged("$property$");
		}
	} private $type$ _$property$;
	$end$]]>
			</Code>
		</Snippet>
	</CodeSnippet>
</CodeSnippets>

A Hello World Android App in C#

This post is a continuation of Writing Android apps in C# using MonoDroid.

Writing your first MonoDroid project

Now that you have installed and configured MonoDroid and its prerequisites, you are ready to create your first project.

  1. Open Visual Studio.
  2. Go to File | New | Project.
  3. Choose “Mono for Android”. This is a new project type added by the Mono for Android Visual Studio 2010 Plugin.
  4. Give the project a name and click OK.

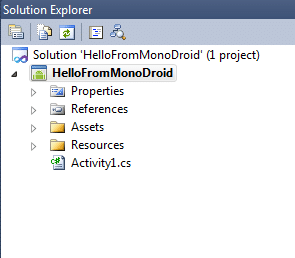
You now have a sample MonoDroid app.

Running your first MonoDroid App in an Emulator

Now that you have a sample MonoDroid app, learning to deploy it to an Android device and to test it is the next step.

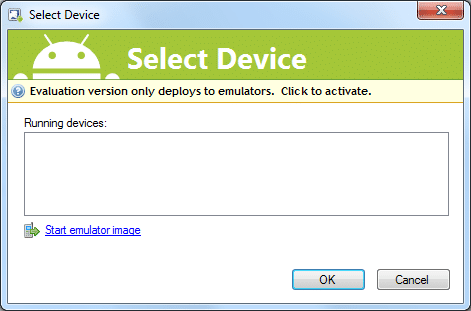
  1. Simply press F5 in your “Mono for Android” Visual Studio project. The following screen appears however, there are no running Android devices.
  2. Click the link to “Start emulator image”.
  3. Wait until your Android emulator starts and you see the graphical display and not just a text display.
  4. Select your emulator from the Running Devices list and click OK.
  5. Wait. It is going to deploy the mono library to your emulator and deploy your app and this can take time.

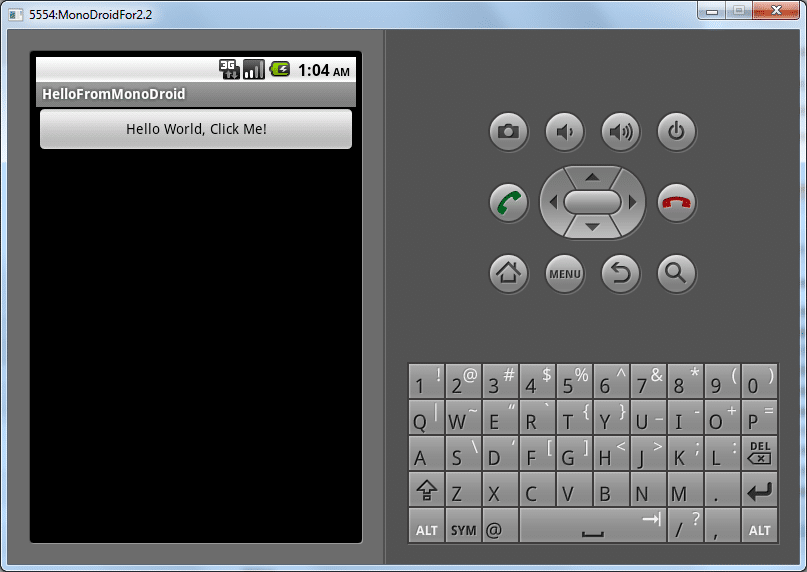
You application should now be running in your Android emulator.

This is just a sample application that increments a counter and displays how many times you have click the button.

You are now ready to start writing your own application.

More Tutorials

Xamarin has multiple Tutorials to help you get a little further along.

MonoDroid Tutororials by Xamarin

Writing Android apps in C# using MonoDroid

As C# developers, many of us would prefer to write Android Apps in C# as well. Novell had promised us MonoDroid, but we were quite concerned as to whether MonoDroid would ever be released when Novell was dismantled.

However, Xamarin spawned from the ashes like a phoenix to restore the viability of MonoDroid, restoring our hopes to writing in C# for the Android platform.

Though I am hopeful that MonoDroid will become popular allowing C# to be a commonly used language for Android devices, there is still some question as to whether Xamarin and its MonoDroid product will survive.

Xamarin is a new company and needs to survive first. Its business is to sell MonoDroid, which is not open source, but is a proprietary product. Unfortunately, MonoDroid may cost too much, preventing adoption among app developers. Xamarin requires a customer base and a continual adoption rate if it is going to survive. If the company folds, what is going to happen to the library and the apps that use it?

Is Development with MonoDroid Free? Yes and No!

Yes and no.

Yes because anybody can use and develop with MonoDroid at no cost. It isn’t until you need to publish an app to the app store that you need to buy a license. You can use the MonoDroid trial for as long as you want. Here is a quote from the trial website. [2]

The evaluation version of Mono for Android does not expire, but enables development and testing against the Android Emulator only.

No, because you need to buy a license once either of the following become true:

  1. You need to test your code directly on a real device and not just an emulated device
  2. You are ready to publish an app to the app store

So what is the cost of MonoDroid? Depends on if you buy Professional, Enterprise, or Enterprise Priority. On the Xamarin store, the following table can be found. To see it you have to add MonoDroid to your cart and then click the “Show product comparison” link. [1]

Professional Enterprise Enterprise Priority
Deploy to your devices Has this feature Has this feature Has this feature
Publish to app stores Has this feature Has this feature Has this feature
Enterprise distribution Has this feature Has this feature
Priority support queue Has this feature
Guaranteed response time Has this feature
License expiration Never Never Never
Update subscription 1 Year 1 Year 1 Year
License usage Original User Seat Seat
Price (USD) $399 $999 $2,499

These costs are very low for business or enterprise customers who have C# developers and want to write Android apps. The cost of training a C# developer to develop apps for Android in Java may be far greater than training them to develop apps for Android using C# and buying a MonoDroid license.

Is MonoDroid easy to set up?

MonoDroid is simple to set up. Xamarin has some simple steps that can be found on their web site. They have MonoDroid installation instructions for installing MonoDroid for use with any of three environments.

  1. Visual Studio (Important! Visual Studio Express is not supported)
  2. MonoDevelop on Windows
  3. MonoDevelop on Mac OSX

If you don’t have a Visual Studio license and you can’t afford one, then go with MonoDevelop because Visual Studio Express is noted to be enough [3].

However, the Visual Studio install is four simple steps.

  1. Install the Java SDK
  2. Install the Android SDK
  3. Configure your simulator
  4. Install the Mono for Android Visual Studio 2010 Plugin

These are very easy steps to complete, and I won’t repeat the steps here, but once you complete them, you are ready to start writing Android apps in C#.

Once you feel you have everything installed, click the following link to continue reading.

Writing your first MonoDroid project


http://android.xamarin.com/Installation/Windows

How to have the TextBlock in a left column of a Grid in a ListView Template expand or shrink with text wrapping?

Ok, lets say you want to have a Grid where each item is a row of data in a Grid. The left most column should expand or shrink, and yes the text should wrap when it shrinks.

Not so easy…but it can be done if you use the right tools.

  • Use a DockPanel not a Grid
  • Make the left most column the last one added
<Window x:Class="ListBoxWithWrap.MainWindow"
        xmlns="http://schemas.microsoft.com/winfx/2006/xaml/presentation"
        xmlns:x="http://schemas.microsoft.com/winfx/2006/xaml"
        Title="MainWindow"
        mc:Ignorable="d" xmlns:d="http://schemas.microsoft.com/expression/blend/2008"
        xmlns:mc="http://schemas.openxmlformats.org/markup-compatibility/2006"
        d:DesignHeight="242"
        d:DesignWidth="388"
        >
    <Grid>
        <DockPanel Name="MainGrid" HorizontalAlignment="Stretch">
            <!-- These four blocks will have other content eventually, but only need to be 45 wide -->
            <TextBlock Text="X" Grid.Column="1" HorizontalAlignment="Center" Width="45" DockPanel.Dock="Right"/>
            <TextBlock Text="X" Grid.Column="2" HorizontalAlignment="Center" Width="45" DockPanel.Dock="Right"/>
            <TextBlock Text="X" Grid.Column="3" HorizontalAlignment="Center" Width="45" DockPanel.Dock="Right"/>
            <TextBlock Text="X" Grid.Column="4" HorizontalAlignment="Center" Width="45" DockPanel.Dock="Right"/>
            <!-- This is the TextBlock that needs to wrap its content (and
                             change the height of the row (so the full content is still
                             visible) to whatever the available space is, but should not
                             make overall ListView wider than the parent's width. -->
            <TextBlock Text="A very long string that should wrap when the window is small." Padding="20,6,6,6" TextWrapping="Wrap" DockPanel.Dock="Right"/>
        </DockPanel>
    </Grid>
</Window>

You will see that this works as you desire.

Now put this in a ListView’s Template and set it to use Binding.

<Window x:Class="ListBoxWithWrap.MainWindow"
        xmlns="http://schemas.microsoft.com/winfx/2006/xaml/presentation"
        xmlns:x="http://schemas.microsoft.com/winfx/2006/xaml"
        Title="MainWindow"
        mc:Ignorable="d"
        xmlns:d="http://schemas.microsoft.com/expression/blend/2008"
        xmlns:mc="http://schemas.openxmlformats.org/markup-compatibility/2006"
        d:DesignHeight="242"
        d:DesignWidth="388"
        SizeToContent="WidthAndHeight">
    <Grid>
        <ListView Name="lvWrap" ItemsSource="{Binding}">
            <ListView.ItemTemplate>
                <DataTemplate>
                    <DockPanel Name="MainGrid" HorizontalAlignment="Stretch">
                        <!-- These four blocks will have other content eventually, but only need to be 45 wide -->
                        <TextBlock Text="X" Grid.Column="1" HorizontalAlignment="Center" Width="45" DockPanel.Dock="Right"/>
                        <TextBlock Text="X" Grid.Column="2" HorizontalAlignment="Center" Width="45" DockPanel.Dock="Right"/>
                        <TextBlock Text="X" Grid.Column="3" HorizontalAlignment="Center" Width="45" DockPanel.Dock="Right"/>
                        <TextBlock Text="X" Grid.Column="4" HorizontalAlignment="Center" Width="45" DockPanel.Dock="Right"/>
                        <!-- This is the TextBlock that needs to wrap its content (and
                             change the height of the row (so the full content is still
                             visible) to whatever the available space is, but should not
                             make overall ListView wider than the parent's width. -->
                        <TextBlock Text="{Binding Content}" Padding="20,6,6,6" TextWrapping="Wrap" DockPanel.Dock="Right"/>
                    </DockPanel>
                </DataTemplate>
            </ListView.ItemTemplate>
        </ListView>
    </Grid>
</Window>

Now give it some data to bind to.

using System.Collections.Generic;
using System.Windows;
using System.Windows.Documents;

namespace ListBoxWithWrap
{
    /// <summary>
    /// Interaction logic for MainWindow.xaml
    /// </summary>
    public partial class MainWindow : Window
    {
        public MainWindow()
        {
            InitializeComponent();

            List<SomeItem> list = new List<SomeItem>();
            list.Add(new SomeItem() { Content = "Some very long string with so many words there should be some wrapping going on to prevent a line of text that is too long" });
            list.Add(new SomeItem() { Content = "Some very long string with so many words there should be some wrapping going on to prevent a line of text that is too long" });
            list.Add(new SomeItem() { Content = "Some very long string with so many words there should be some wrapping going on to prevent a line of text that is too long" });
            list.Add(new SomeItem() { Content = "Some very long string with so many words there should be some wrapping going on to prevent a line of text that is too long" });
            list.Add(new SomeItem() { Content = "Some very long string with so many words there should be some wrapping going on to prevent a line of text that is too long" });

            lvWrap.DataContext = list;
        }

        public class SomeItem
        {
            public string Content { get; set; }
        }
    }
}

The shrink with text wrapping no longer works once inside of the ListView. So that tells you that something to do with the ListView is breaking the feature you want.

Here is how you fix this:

1. Open your project in Expression Blend. (If you don’t have Expression Blend, maybe just look at my code below and copy it)

2. Right-Click on the ListView in the Object and Timeline tab and choose Edit Template | Edit a Copy.

3. Click OK on the next Window.

This will create the following resource code.

<Window.Resources>
		<SolidColorBrush x:Key="ListBorder" Color="#828790"/>
		<Style x:Key="ListViewStyle1" TargetType="{x:Type ListView}">
			<Setter Property="Background" Value="{DynamicResource {x:Static SystemColors.WindowBrushKey}}"/>
			<Setter Property="BorderBrush" Value="{StaticResource ListBorder}"/>
			<Setter Property="BorderThickness" Value="1"/>
			<Setter Property="Foreground" Value="{DynamicResource {x:Static SystemColors.ControlTextBrushKey}}"/>
			<Setter Property="ScrollViewer.HorizontalScrollBarVisibility" Value="Auto"/>
			<Setter Property="ScrollViewer.VerticalScrollBarVisibility" Value="Auto"/>
			<Setter Property="ScrollViewer.CanContentScroll" Value="true"/>
			<Setter Property="ScrollViewer.PanningMode" Value="Both"/>
			<Setter Property="Stylus.IsFlicksEnabled" Value="False"/>
			<Setter Property="VerticalContentAlignment" Value="Center"/>
			<Setter Property="Template">
				<Setter.Value>
					<ControlTemplate TargetType="{x:Type ListView}">
						<Border x:Name="Bd" BorderBrush="{TemplateBinding BorderBrush}" BorderThickness="{TemplateBinding BorderThickness}" Background="{TemplateBinding Background}" Padding="1" SnapsToDevicePixels="true">
							<ScrollViewer Focusable="false" Padding="{TemplateBinding Padding}">
								<ItemsPresenter SnapsToDevicePixels="{TemplateBinding SnapsToDevicePixels}"/>
							</ScrollViewer>
						</Border>
						<ControlTemplate.Triggers>
							<Trigger Property="IsEnabled" Value="false">
								<Setter Property="Background" TargetName="Bd" Value="{DynamicResource {x:Static SystemColors.ControlBrushKey}}"/>
							</Trigger>
							<Trigger Property="IsGrouping" Value="true">
								<Setter Property="ScrollViewer.CanContentScroll" Value="false"/>
							</Trigger>
						</ControlTemplate.Triggers>
					</ControlTemplate>
				</Setter.Value>
			</Setter>
		</Style>
	</Window.Resources>

4. Now look at what is surrounding the ItemPresenter. Yes, you see the ScrollViewer, which is your problem. Delete it.

5. Build you project.

Success! Now your feature to both expand or shrink with text wrapping is back.

Here is the final XAML.

<Window x:Class="ListBoxWithWrap.MainWindow"
        xmlns="http://schemas.microsoft.com/winfx/2006/xaml/presentation"
        xmlns:x="http://schemas.microsoft.com/winfx/2006/xaml"
        Title="MainWindow"
        mc:Ignorable="d"
        xmlns:d="http://schemas.microsoft.com/expression/blend/2008"
        xmlns:mc="http://schemas.openxmlformats.org/markup-compatibility/2006"
        d:DesignHeight="242"
        d:DesignWidth="388"
        SizeToContent="WidthAndHeight">
    <Window.Resources>
        <SolidColorBrush x:Key="ListBorder" Color="#828790"/>
        <Style x:Key="ListViewStyle1" TargetType="{x:Type ListView}">
            <Setter Property="Background" Value="{DynamicResource {x:Static SystemColors.WindowBrushKey}}"/>
            <Setter Property="BorderBrush" Value="{StaticResource ListBorder}"/>
            <Setter Property="BorderThickness" Value="1"/>
            <Setter Property="Foreground" Value="{DynamicResource {x:Static SystemColors.ControlTextBrushKey}}"/>
            <Setter Property="ScrollViewer.HorizontalScrollBarVisibility" Value="Auto"/>
            <Setter Property="ScrollViewer.VerticalScrollBarVisibility" Value="Auto"/>
            <Setter Property="ScrollViewer.CanContentScroll" Value="true"/>
            <Setter Property="ScrollViewer.PanningMode" Value="Both"/>
            <Setter Property="Stylus.IsFlicksEnabled" Value="False"/>
            <Setter Property="VerticalContentAlignment" Value="Center"/>
            <Setter Property="Template">
                <Setter.Value>
                    <ControlTemplate TargetType="{x:Type ListView}">
                        <Border x:Name="Bd" BorderBrush="{TemplateBinding BorderBrush}" BorderThickness="{TemplateBinding BorderThickness}" Background="{TemplateBinding Background}" Padding="1" SnapsToDevicePixels="true">
                            <ItemsPresenter SnapsToDevicePixels="{TemplateBinding SnapsToDevicePixels}"/>
                        </Border>
                        <ControlTemplate.Triggers>
                            <Trigger Property="IsEnabled" Value="false">
                                <Setter Property="Background" TargetName="Bd" Value="{DynamicResource {x:Static SystemColors.ControlBrushKey}}"/>
                            </Trigger>
                            <Trigger Property="IsGrouping" Value="true">
                                <Setter Property="ScrollViewer.CanContentScroll" Value="false"/>
                            </Trigger>
                        </ControlTemplate.Triggers>
                    </ControlTemplate>
                </Setter.Value>
            </Setter>
        </Style>
    </Window.Resources>
    <Grid>
        <ListView Name="lvWrap" ItemsSource="{Binding}" Style="{DynamicResource ListViewStyle1}">
            <ListView.ItemTemplate>
                <DataTemplate>
                    <DockPanel Name="MainGrid" HorizontalAlignment="Stretch">
                        <!-- These four blocks will have other content eventually, but only need to be 45 wide -->
                        <TextBlock Text="X" Grid.Column="1" HorizontalAlignment="Center" Width="45" DockPanel.Dock="Right"/>
                        <TextBlock Text="X" Grid.Column="2" HorizontalAlignment="Center" Width="45" DockPanel.Dock="Right"/>
                        <TextBlock Text="X" Grid.Column="3" HorizontalAlignment="Center" Width="45" DockPanel.Dock="Right"/>
                        <TextBlock Text="X" Grid.Column="4" HorizontalAlignment="Center" Width="45" DockPanel.Dock="Right"/>
                        <!-- This is the TextBlock that needs to wrap its content (and
                             change the height of the row (so the full content is still
                             visible) to whatever the available space is, but should not
                             make overall ListView wider than the parent's width. -->
                        <TextBlock Text="{Binding Content}" Padding="20,6,6,6" TextWrapping="Wrap" DockPanel.Dock="Right"/>
                    </DockPanel>
                </DataTemplate>
            </ListView.ItemTemplate>
        </ListView>
    </Grid>
</Window>

You should now have a little bit more understanding of the ListView template and how to manipulate it, which should translate to other objects in WPF as well.

How to animate an edit box to slide in and out using Expression Blend

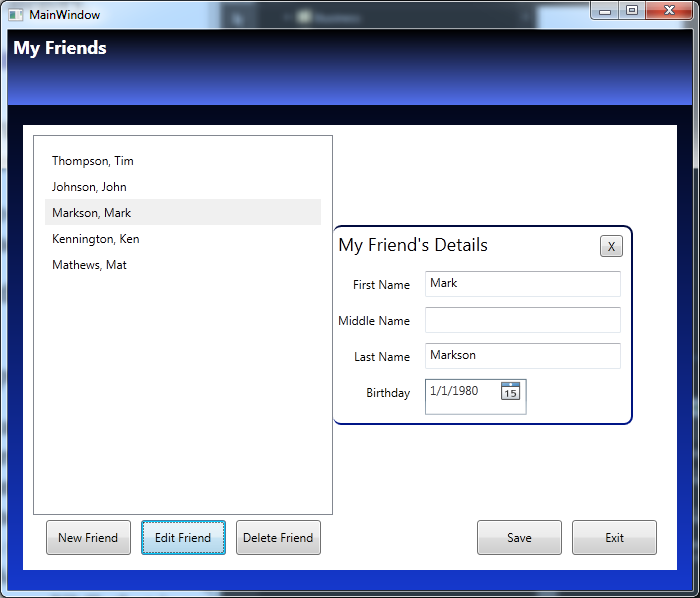
Ok…so I created a simple WPF and MVVM application called My Friends.  This is just a simple applications, the main goal was not to create a My Friend app, but do demonstrate how to make an edit box slide in an out.

The application is too big to give you step by step instructions to create the whole application, so instead, I am going to make it available for download and then tell you how to see the changes.

  1. Download and extract the solution from the link below:
    MyFriends.zip
  2. Open the project in Expression Blend (not Visual Studio).
  3. Get to know the Application. (Ok, I guess you could do this part in Visual Studio…but the intent is to learn an Expression Blend feature.)
    Check out the Person and PersonCollection classes in the Model folder.
    Check out the Views and the corresponding ViewModels and look at the binding statements.
    The MVVM folder has some standard MVVM classes, that if you know MVVM you should be familiar with.
    The business has an XML Serialization helper class.
    The data folder contains an XML that is serialized from the PersonCollection class.
  4. In Expression Blend, open the View\FriendListView.xaml.
  5. In the Objects and Timeline tab, get to know the assets that are being used. (I think they are all standard assets. I don’t think I am using anything that doesn’t come with .NET and Expression Blend by default.)
  6. In the Objects and Timeline tab, specifically look at the PersonDetailsView object.
    Notice it is behind the FriendList.
    This is the edit box that is animated and it will slide to the right when you click edit.
  7. Go to the States tab.
    Look a the State group that is created. There are two groups: EditFriendOpenState and EditFriendClosedState.  The names should be obvious.
    Notice the Transition duration is set to .5 and notice the Easing function.
  8. There is a behavior or action called GoToStateAction that was dragged over the Edit button and configured to change the state to EditFriendOpenState.
  9. The GoToStateAction was also dragged over the X button on the edit page and configured to change the state toEditFriendClosedState.
  10. Build the application and see how the state changes and how it uses the Easing function for .5 seconds to slide the edit field out.

Here is a sample image:

Anyway, I hope you find this a fun sample application to learn with.


This project is also an example of:

  • Basic C#
  • Xml Serialization
  • MVVM (including ICommand and RelayCommand with buttons)
  • Using Data Converters (as one converter is used)

Exercises for further learning:

LINQ exercise

  • There is a comment in the View\FriendListView.xaml that uses LINQ, but there is a reason LINQ wasn’t used, can you determine the reason.
  • What would you have to do to use LINQ and make the application work?

DateTime exercise

  • There is an Age property that was left commented out.  Uncomment it, make it read-only and make it provide the correct number in years based on the Birthday.

How to make a transparent cube in Expression Design

In order to provide a good example of using the polygon and square tool, here is how to make a square look 3D.  Be aware that is a 2D image made to look like 3D.

Transparent Cube

What you will learn

  • Using the rectangle tool
  • Using the polygon tool
  • Make edges by simply using slight color variations
  • Transparency
  • Front vs back placement of element

Step 1 – Create a new Expression Design document

  1. Open Expression Design and click File | New.
  2. Name the file TransparentSquare.design (or whatever name you would like).
    Note: I used a custom width and height of 300x 300, and left the resolution at 96.
  3. Click OK.

Step 2 – Create the first square

This first square will be the face of the cube.

  1. Click the Rectangle on the ToolBox.
    Note: If you cannot find it, try pressing “M” as that is the shortcut key.
  2. Draw a rectangle on the screen while holding down the shift key(the shift key is what tells Expression Design that you are looking for a perfect square and not a rectangle).
    Note: The X and Y placement of the square are: 131.5, 160. The width and height of my square are both 200.2 px. The Rotation Angle and Skew Angle are both 0.
  3. With the square selected, go to the properties tab.
  4. Under Appearance, click the Fill tab.
    Note: Hold your cursor over the tab and it will tell you which tab is the Fill tab and which is the Stroke tab.
  5. Select the Gradient option.
    Note: It is the bottom left of the four boxes just left of the color boxes. Once you click this, you will have a gradient bar.
  6. To the right of the gradient bar, there are two gradient options: Linear Gradient, Radial Gradient.
    Choose Linear Gradient.
  7. On the gradient bar, you should see two markers (squares with a triangle on top).
    Click the left marker and set the color to a nice blue.
    I used #5A78D8.
  8. Click the right marker and set the color to a blue that is darker than the first one you selected.
    Note: I used color #153FC4.
  9. Click the Stroke tab.
  10. Under the Stroke tab and all the way under the color picker, look for a drop down menu. (By default this menu has an image of a black line but can have many options.)
  11. Change it to No Stroke.
  12. Change the Stroke Width to 0 px.
  13. For Transparency, there is an Opacity setting. In case you didn’t know, Opacity is the antonym of Transparent, so setting the Opacity to 90% would be the same as setting a Transparency of 10%.
    Set the Opacity to 90%.

Step 3 – Create the right side of the cube using the Polygon tool

  1. Click the Polygon on the ToolBox.
    Note: If you cannot find it, try pressing “J” as that is the shortcut key.
  2. Draw a polygon on the screen just to the right of the square.
    The size doesn’t really as it will get its size as we move the corners into place.
    Note: The width and height of my square are both 200.2 px.
  3. With the polygon selected, go to the properties tab.
  4. Changes the points from 4 (there are only 3 points by default).
  5. Click Direct Selection on the ToolBox.
    Note: If you cannot find it, try pressing “A” as that is the shortcut key.
  6. Click the bottom left corner of the Polygon and drag it to exactly the bottom right corner of the first square.
    Note: Zooming in can really help you get the corners to line up.
  7. Click the top left corner of the Polygon and drag it to exactly the top right corner of the first square.
  8. Make sure the left side line of the polygon is perfectly straight up and down to match the square.
  9. Click the top right corner of the polygon and drag somewhere up and to the right at an angle that seems to be a good perspective angle.
  10. Click the top right corner of the polygon and drag somewhere up and to the right at an angle that seems to be a good perspective angle, probably a little bit sharper an angle than the top angle.
  11. Make sure the right side line of the polygon is perfectly straight up and down to match the square
  12. Remove the Stroke.  You should already know how to do this now.
  13. Set the Fill to a single color that is a slight variation of the blue we used for the face of the square.
    Note: I used #002DB8.
  14. Set the Opacity to 90%.

Step 4 – Create the top side of the cube using the polygon tool

Note: These steps are a little more general as you have already performed these above.

  1. Click the Polygon on the ToolBox.
  2. Draw a polygon on the screen just to the top of the square face.
  3. Changes the points from 4 (there are only 3 points by default but since you already chose 4 it maybe is chosen for you now).
  4. Click Direct Selection on the ToolBox.
  5. Move the four corners of the polygon into place.  Three of the corners are already positioned for you. Only the top left corner is not.  Make sure to give it a little more angle to make the perspective look right.
  6. Remove the Stroke.
  7. Set the Fill on top to gradient and use a lighter blue.
    Note: I used#92A7EB for the left gradient stop and #7B97EB for the right gradient stop.
  8. Set the Opacity to 90%.

Step 5 – Create a the back of the cube

Ok, well only give a few steps this time. You should be able to do this without perfect step by step instructions, now.

  1. Copy and paste the square face (that way you get the Stroke and Fill and Opacity settings already configured).
  2. Notice that three of the corners are placed for you so you can simply resize the new a square and connect it to the three corners.
  3. You may find that this doesn’t look quite right because this square is in front of the other items you have already created.  Right-click on it and choose Arrange | Send to back.

Step 6 – Create the left side of the cube using the polygon tool

Ok, you now have created two polygon sides. You now need to create a third.  No hand-holding this time.  Just create it very similar to how you created the previous two.  It would be nice if you could just copy the right polygon and have it fit perfectly but it doesn’t fit.  Do you know why? That is right, due to perspective the angle is different so the left side is a little bigger than the right side.  However, you can still use copy and paste, you just have to place the corners.

You don’t need to create a bottom for the cube because it just appears to be already created due to transparency.

You are finished!

Click the Sphere to download a zip file containing: BlueSphere.design, a BlueSphere.png and a BlueSphere.xaml.

Transparent Cube


Download