Archive for the ‘C# (C-Sharp)’ Category.

A snippet for Properties in a ViewModel

If you are using MVVM you probably should create a snippet very similar to the following to save time.

C:\Program Files (x86)\Microsoft Visual Studio 10.0\VC#\Snippets\1033\Visual C#\propvm.snippet

<?xml version="1.0" encoding="utf-8" ?>
<CodeSnippets  xmlns="http://schemas.microsoft.com/VisualStudio/2005/CodeSnippet">
	<CodeSnippet Format="1.0.0">
		<Header>
			<Title>propvm</Title>
			<Shortcut>propvm</Shortcut>
			<Description>Code snippet for property and backing field for a ViewModel that calls NotifyPropertyChanged.</Description>
			<Author>Jared Barneck</Author>
			<SnippetTypes>
				<SnippetType>Expansion</SnippetType>
			</SnippetTypes>
		</Header>
		<Snippet>
			<Declarations>
				<Literal>
					<ID>type</ID>
					<ToolTip>Property type</ToolTip>
					<Default>int</Default>
				</Literal>
				<Literal>
					<ID>property</ID>
					<ToolTip>Property name</ToolTip>
					<Default>MyProperty</Default>
				</Literal>
			</Declarations>
			<Code Language="csharp"><![CDATA[public $type$ $property$
	{
		get { return _$property$;}
		set 
		{ 
			_$property$ = value;
			NotifyPropertyChanged("$property$");
		}
	} private $type$ _$property$;
	$end$]]>
			</Code>
		</Snippet>
	</CodeSnippet>
</CodeSnippets>

WPF Binding to a property of a static class

Binding to a property of a static class is quite straight forward.

The binding string looks like this:

{x:Static s:MyStaticClass.StaticValue2}

For an example do this:

  1. Create a new folder in your project called Statics.
  2. Add the following class to the Statics folder.
    using System;
    
    namespace BindingToStaticClassExample.Statics
    {
        public static class MyStaticClass
        {
            static MyStaticClass()
            {
                Title = "Binding to properties of Static Classes";
                StaticValue1 = "Test 1";
                StaticValue2 = "Test 2";
                StaticValue3 = "Test 3";
            }
    
            public static String Title { get; set; }
            public static String StaticValue1 { get; set; }
            public static String StaticValue2 { get; set; }
            public static String StaticValue3 { get; set; }
        }
    }
    
  3. Add a reference to the BindingToStaticClassExample.Statics namespace. (See line 4.)
  4. Bind the title to the Title string value of MyStaticClass.
  5. Change the <Grid> to a <StackPanel> (not required just for ease of this example).
  6. Add TextBox elements and bind them to the two string values in MyStaticClass object.
    <Window x:Class="BindingToStaticClassExample.MainWindow"
            xmlns="http://schemas.microsoft.com/winfx/2006/xaml/presentation"
            xmlns:x="http://schemas.microsoft.com/winfx/2006/xaml"
            xmlns:s="clr-namespace:BindingToStaticClassExample.Statics"
            Title="{x:Static s:MyStaticClass.Title}" Height="350" Width="525">
        <StackPanel>
            <TextBox Text="{x:Static s:MyStaticClass.StaticValue1}" />
            <TextBox Text="{x:Static s:MyStaticClass.StaticValue2}" />
            <!-- Not supported and won't work
            <TextBox>
                <TextBox.Text>
                    <Binding Source="{x:Static s:MyStaticClass.StaticValue3}" />
                </TextBox.Text>
            </TextBox>
            -->
        </StackPanel>
    </Window>
    

You now know how to bind to properties of a static class.

How to make the WPF Canvas mouse click event work?

The problem with Canvas is that when you click on it, you don’t actually get the click event to occur unless you have a background that is not white.

One trick if you want white is to use white -1 or #FFFFFE or possibly Transparent (unless the parent is not white). So no one can tell it isn’t white, because it is as close to white as can be without actually being white.

Now your click event can occur.

Also you need to make the Canvas focusable.

Example 1 – Getting a Canvas to take keyboard focus from a TextBox with a mouse click

Here is how you make this happen.

  1. First create a new WPF Project.
  2. Add a Canvas and clear the any sizing.
  3. Change the Canvas Background to #FFFFFE.
  4. Set the Canvas to be Focusable.
  5. Add a TextBox in the Canvas.
  6. Create a mouse down event for the Canvas.

MainWindow.xaml

<Window x:Class="TextBoxInCanvas.MainWindow"
 xmlns="http://schemas.microsoft.com/winfx/2006/xaml/presentation"
 xmlns:x="http://schemas.microsoft.com/winfx/2006/xaml"
        Title="MainWindow" Height="350" Width="525">
    <Grid Name="MainGrid">
 <canvas name="<span class=" span="" class="hiddenSpellError" pre="class ">hiddenspellerror="" pre="">canvas1" Focusable="True" Background="#FFFFFE" MouseDown="canvas1_MouseDown"></canvas>
 <TextBox Height="23" Name="textBox1" Width="120" IsEnabled="True" Canvas.Left="81" Canvas.Top="115"
                     PreviewKeyDown="textBox1_PreviewKeyDown"/>
        </Canvas>
    </Grid>
</Window>

MainWindow.xaml.cs

using System.Windows;
using System.Windows.Input;
namespace TextBoxInCanvas
{
    /// <summary>
    /// Interaction logic for MainWindow.xaml
    /// </summary>
    public partial class MainWindow : Window
    {
        public MainWindow()
        {
            InitializeComponent();
        }

        private void canvas1_MouseDown(object sender, MouseButtonEventArgs e)
        {
            Keyboard.Focus(canvas1);
        }

        private void textBox1_PreviewKeyDown(object sender, KeyEventArgs e)
        {
            if (Key.Enter == e.Key)
                Keyboard.Focus(canvas1);
        }
    }
}

Now your click event occurs when the Canvas is clicked and keyboard focus is taken from the TextBox.

A Hello World Android App in C#

This post is a continuation of Writing Android apps in C# using MonoDroid.

Writing your first MonoDroid project

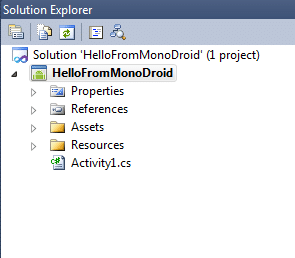
Now that you have installed and configured MonoDroid and its prerequisites, you are ready to create your first project.

  1. Open Visual Studio.
  2. Go to File | New | Project.
  3. Choose “Mono for Android”. This is a new project type added by the Mono for Android Visual Studio 2010 Plugin.
  4. Give the project a name and click OK.

You now have a sample MonoDroid app.

Running your first MonoDroid App in an Emulator

Now that you have a sample MonoDroid app, learning to deploy it to an Android device and to test it is the next step.

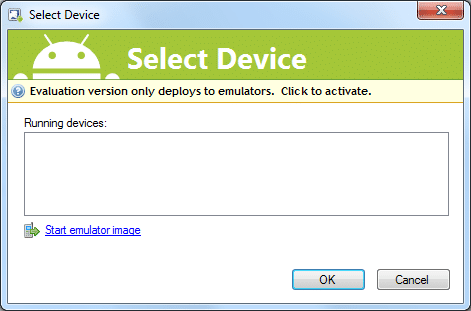
  1. Simply press F5 in your “Mono for Android” Visual Studio project. The following screen appears however, there are no running Android devices.
  2. Click the link to “Start emulator image”.
  3. Wait until your Android emulator starts and you see the graphical display and not just a text display.
  4. Select your emulator from the Running Devices list and click OK.
  5. Wait. It is going to deploy the mono library to your emulator and deploy your app and this can take time.

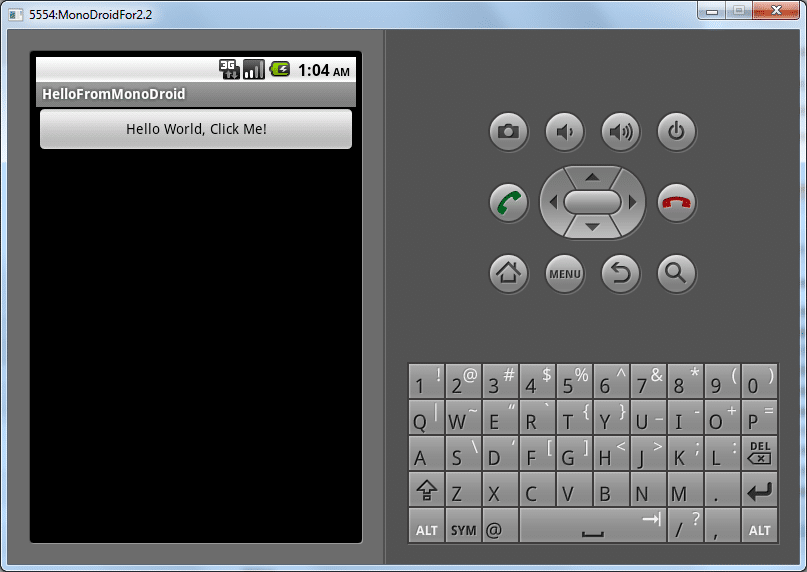
You application should now be running in your Android emulator.

This is just a sample application that increments a counter and displays how many times you have click the button.

You are now ready to start writing your own application.

More Tutorials

Xamarin has multiple Tutorials to help you get a little further along.

MonoDroid Tutororials by Xamarin

Writing Android apps in C# using MonoDroid

As C# developers, many of us would prefer to write Android Apps in C# as well. Novell had promised us MonoDroid, but we were quite concerned as to whether MonoDroid would ever be released when Novell was dismantled.

However, Xamarin spawned from the ashes like a phoenix to restore the viability of MonoDroid, restoring our hopes to writing in C# for the Android platform.

Though I am hopeful that MonoDroid will become popular allowing C# to be a commonly used language for Android devices, there is still some question as to whether Xamarin and its MonoDroid product will survive.

Xamarin is a new company and needs to survive first. Its business is to sell MonoDroid, which is not open source, but is a proprietary product. Unfortunately, MonoDroid may cost too much, preventing adoption among app developers. Xamarin requires a customer base and a continual adoption rate if it is going to survive. If the company folds, what is going to happen to the library and the apps that use it?

Is Development with MonoDroid Free? Yes and No!

Yes and no.

Yes because anybody can use and develop with MonoDroid at no cost. It isn’t until you need to publish an app to the app store that you need to buy a license. You can use the MonoDroid trial for as long as you want. Here is a quote from the trial website. [2]

The evaluation version of Mono for Android does not expire, but enables development and testing against the Android Emulator only.

No, because you need to buy a license once either of the following become true:

  1. You need to test your code directly on a real device and not just an emulated device
  2. You are ready to publish an app to the app store

So what is the cost of MonoDroid? Depends on if you buy Professional, Enterprise, or Enterprise Priority. On the Xamarin store, the following table can be found. To see it you have to add MonoDroid to your cart and then click the “Show product comparison” link. [1]

Professional Enterprise Enterprise Priority
Deploy to your devices Has this feature Has this feature Has this feature
Publish to app stores Has this feature Has this feature Has this feature
Enterprise distribution Has this feature Has this feature
Priority support queue Has this feature
Guaranteed response time Has this feature
License expiration Never Never Never
Update subscription 1 Year 1 Year 1 Year
License usage Original User Seat Seat
Price (USD) $399 $999 $2,499

These costs are very low for business or enterprise customers who have C# developers and want to write Android apps. The cost of training a C# developer to develop apps for Android in Java may be far greater than training them to develop apps for Android using C# and buying a MonoDroid license.

Is MonoDroid easy to set up?

MonoDroid is simple to set up. Xamarin has some simple steps that can be found on their web site. They have MonoDroid installation instructions for installing MonoDroid for use with any of three environments.

  1. Visual Studio (Important! Visual Studio Express is not supported)
  2. MonoDevelop on Windows
  3. MonoDevelop on Mac OSX

If you don’t have a Visual Studio license and you can’t afford one, then go with MonoDevelop because Visual Studio Express is noted to be enough [3].

However, the Visual Studio install is four simple steps.

  1. Install the Java SDK
  2. Install the Android SDK
  3. Configure your simulator
  4. Install the Mono for Android Visual Studio 2010 Plugin

These are very easy steps to complete, and I won’t repeat the steps here, but once you complete them, you are ready to start writing Android apps in C#.

Once you feel you have everything installed, click the following link to continue reading.

Writing your first MonoDroid project


http://android.xamarin.com/Installation/Windows

In C#, how to determine if a class or an instance of the class implements an interface

I needed to determine if a class or one of its instances implements and interface. So I created this test project to see if this works.

Turns out it is really easy to do. Here is a test project that I used to learn. Just create a new console project and stick this code in the Program.cs and check it out.

namespace TestIfThisImplementsInterface
{
    class Program
    {
        static void Main(string[] args)
        {
            // Test if the type or its parent implements the interface
            bool bCarClass = typeof(IDrivable).IsAssignableFrom(typeof(Car));             // True
            bool bFordFocusClass = typeof(IDrivable).IsAssignableFrom(typeof(FordFocus)); // True
            bool bJunkerClass = typeof(IDrivable).IsAssignableFrom(typeof(Junker));       // False

            // Test if the exact type and not its parent implements the derived type
            bool bCarClassEx = typeof(Car).GetInterface(typeof(IDrivable).FullName) != null;           // True
            bool bFordFocusClassEx = typeof(Vehicle).GetInterface(typeof(IDrivable).FullName) != null; // False
            bool bJunkerClassEx = typeof(Junker).GetInterface(typeof(IDrivable).FullName) != null;     // True

            // Test if an instance implements or derivces from an oject that implements the interface
            bool bCarInstance = new Car() is IDrivable;             // True
            bool bFordFocusInstance = new FordFocus() is IDrivable; // True
            bool bJunkerInstance = new Junker() is IDrivable;       // False

            // Test if an instance implements or derivces from an oject that implements the interface
            bool bCarInstanceEx = new Car().GetType().GetInterface(typeof(IDrivable).FullName) != null;             // True
            bool bFordFocusInstanceEx = new FordFocus().GetType().GetInterface(typeof(IDrivable).FullName) != null; // False
            bool bJunkerInstanceEx = new Junker().GetType().GetInterface(typeof(IDrivable).FullName) != null;       // False

            // Show that the test can be in the parent class but the actual class is what is tested
            // This is actually what I needed. Glad it worked!
            bool bCarParentFunction = new Car().IsDrivable;             // True
            bool bFordFocusParentFunction = new FordFocus().IsDrivable; // True
            bool bJunkerParentFunction = new Junker().IsDrivable;       // False
        }
    }

    public interface IDrivable
    {
        void Drive();
    }

    public class Vehicle
    {
        public virtual bool IsDrivable
        {
            get { return this is IDrivable; }
        }
    }

    public class Car : Vehicle, IDrivable
    {
        #region IDrivable Members
        public void Drive()
        {
            // Drive code here
        }
        #endregion
    }

    public class FordFocus : Car
    {
    }

    public class Junker : Vehicle
    {
    }
}

Resource:
http://www.hanselman.com/blog/DoesATypeImplementAnInterface.aspx

How to authenticate and access the registry remotely using C#

Connecting to the remote registry of another workstation or server can be done as long as authentication has been done first.

Here is an example for connecting to remote registry.

  1. Create a new C# Console project in Visual Studio.
  2. Add a new class called NetworkShare. I know I got this from another site sometime last year and added to it, but I didn’t document the source web site.
    using System;
    using System.Runtime.InteropServices;
    
    using BOOL = System.Int32;
    
    namespace NetworkConnection
    {
        public class NetworkShare
        {
            #region Member Variables
            [DllImport("mpr.dll")]
            private static extern int WNetAddConnection2A(ref NetResource refNetResource, string inPassword, string inUsername, int inFlags);
            [DllImport("mpr.dll")]
            private static extern int WNetCancelConnection2A(string inServer, int inFlags, int inForce);
    
            private String _Server;
            private String _Share;
            private String _DriveLetter = null;
            private String _Username = null;
            private String _Password = null;
            private int _Flags = 0;
            private NetResource _NetResource = new NetResource();
            BOOL _AllowDisconnectWhenInUse = 0; // 0 = False; Any other value is True;
            #endregion
    
            #region Constructors
            /// <summary>
            /// The default constructor
            /// </summary>
            public NetworkShare()
            {
            }
    
            /// <summary>
            /// This constructor takes a server and a share.
            /// </summary>
            public NetworkShare(String inServer, String inShare)
            {
                _Server = inServer;
                _Share = inShare;
            }
    
            /// <summary>
            /// This constructor takes a server and a share and a local drive letter.
            /// </summary>
            public NetworkShare(String inServer, String inShare, String inDriveLetter)
            {
                _Server = inServer;
                _Share = inShare;
                DriveLetter = inDriveLetter;
            }
    
            /// <summary>
            /// This constructor takes a server, share, username, and password.
            /// </summary>
            public NetworkShare(String inServer, String inShare, String inUsername, String inPassword)
            {
                _Server = inServer;
                _Share = inShare;
                _Username = inUsername;
                _Password = inPassword;
            }
    
            /// <summary>
            /// This constructor takes a server, share, drive letter, username, and password.
            /// </summary>
            public NetworkShare(String inServer, String inShare, String inDriveLetter, String inUsername, String inPassword)
            {
                _Server = inServer;
                _Share = inShare;
                _DriveLetter = inDriveLetter;
                _Username = inUsername;
                _Password = inPassword;
            }
            #endregion
    
            #region Properties
            public String Server
            {
                get { return _Server; }
                set { _Server = value; }
            }
    
            public String Share
            {
                get { return _Share; }
                set { _Share = value; }
            }
    
            public String FullPath
            {
                get { return string.Format(@"\\{0}\{1}", _Server, _Share); }
            }
    
            public String DriveLetter
            {
                get { return _DriveLetter; }
                set { SetDriveLetter(value); }
            }
    
            public String Username
            {
                get { return String.IsNullOrEmpty(_Username) ? null : _Username; }
                set { _Username = value; }
            }
    
            public String Password
            {
                get { return String.IsNullOrEmpty(_Password) ? null : _Username; }
                set { _Password = value; }
            }
    
            public int Flags
            {
                get { return _Flags; }
                set { _Flags = value; }
            }
    
            public NetResource Resource
            {
                get { return _NetResource; }
                set { _NetResource = value; }
            }
    
            public bool AllowDisconnectWhenInUse
            {
                get { return Convert.ToBoolean(_AllowDisconnectWhenInUse); }
                set { _AllowDisconnectWhenInUse = Convert.ToInt32(value); }
            }
    
            #endregion
    
            #region Functions
            /// <summary>
            /// Establishes a connection to the share.
            ///
            /// Throws:
            ///
            ///
            /// </summary>
            public int Connect()
            {
                _NetResource.Scope = (int)Scope.RESOURCE_GLOBALNET;
                _NetResource.Type = (int)Type.RESOURCETYPE_DISK;
                _NetResource.DisplayType = (int)DisplayType.RESOURCEDISPLAYTYPE_SHARE;
                _NetResource.Usage = (int)Usage.RESOURCEUSAGE_CONNECTABLE;
                _NetResource.RemoteName = FullPath;
                _NetResource.LocalName = DriveLetter;
    
                return WNetAddConnection2A(ref _NetResource, _Password, _Username, _Flags);
            }
    
            /// <summary>
            /// Disconnects from the share.
            /// </summary>
            public int Disconnect()
            {
                int retVal = 0;
                if (null != _DriveLetter)
                {
                    retVal = WNetCancelConnection2A(_DriveLetter, _Flags, _AllowDisconnectWhenInUse);
                    retVal = WNetCancelConnection2A(FullPath, _Flags, _AllowDisconnectWhenInUse);
                }
                else
                {
                    retVal = WNetCancelConnection2A(FullPath, _Flags, _AllowDisconnectWhenInUse);
                }
                return retVal;
            }
    
            private void SetDriveLetter(String inString)
            {
                if (inString.Length == 1)
                {
                    if (char.IsLetter(inString.ToCharArray()[0]))
                    {
                        _DriveLetter = inString + ":";
                    }
                    else
                    {
                        // The character is not a drive letter
                        _DriveLetter = null;
                    }
                }
                else if (inString.Length == 2)
                {
                    char[] drive = inString.ToCharArray();
                    if (char.IsLetter(drive[0]) && drive[1] == ':')
                    {
                        _DriveLetter = inString;
                    }
                    else
                    {
                        // The character is not a drive letter
                        _DriveLetter = null;
                    }
                }
                else
                {
                    // If we get here the value passed in is not valid
                    // so make it null.
                    _DriveLetter = null;
                }
            }
            #endregion
    
            #region NetResource Struct
            [StructLayout(LayoutKind.Sequential)]
            public struct NetResource
            {
                public uint Scope;
                public uint Type;
                public uint DisplayType;
                public uint Usage;
                public string LocalName;
                public string RemoteName;
                public string Comment;
                public string Provider;
            }
            #endregion
    
            #region Enums
            public enum Scope
            {
                RESOURCE_CONNECTED = 1,
                RESOURCE_GLOBALNET,
                RESOURCE_REMEMBERED,
                RESOURCE_RECENT,
                RESOURCE_CONTEXT
            }
    
            public enum Type : uint
            {
                RESOURCETYPE_ANY,
                RESOURCETYPE_DISK,
                RESOURCETYPE_PRINT,
                RESOURCETYPE_RESERVED = 8,
                RESOURCETYPE_UNKNOWN = 4294967295
            }
    
            public enum DisplayType
            {
                RESOURCEDISPLAYTYPE_GENERIC,
                RESOURCEDISPLAYTYPE_DOMAIN,
                RESOURCEDISPLAYTYPE_SERVER,
                RESOURCEDISPLAYTYPE_SHARE,
                RESOURCEDISPLAYTYPE_FILE,
                RESOURCEDISPLAYTYPE_GROUP,
                RESOURCEDISPLAYTYPE_NETWORK,
                RESOURCEDISPLAYTYPE_ROOT,
                RESOURCEDISPLAYTYPE_SHAREADMIN,
                RESOURCEDISPLAYTYPE_DIRECTORY,
                RESOURCEDISPLAYTYPE_TREE,
                RESOURCEDISPLAYTYPE_NDSCONTAINER
            }
    
            public enum Usage : uint
            {
                RESOURCEUSAGE_CONNECTABLE = 1,
                RESOURCEUSAGE_CONTAINER = 2,
                RESOURCEUSAGE_NOLOCALDEVICE = 4,
                RESOURCEUSAGE_SIBLING = 8,
                RESOURCEUSAGE_ATTACHED = 16,
                RESOURCEUSAGE_ALL = 31,
                RESOURCEUSAGE_RESERVED = 2147483648
            }
    
            public enum ConnectionFlags : uint
            {
                CONNECT_UPDATE_PROFILE = 1,
                CONNECT_UPDATE_RECENT = 2,
                CONNECT_TEMPORARY = 4,
                CONNECT_INTERACTIVE = 8,
                CONNECT_PROMPT = 16,
                CONNECT_NEED_DRIVE = 32,
                CONNECT_REFCOUNT = 64,
                CONNECT_REDIRECT = 128,
                CONNECT_LOCALDRIVE = 256,
                CONNECT_CURRENT_MEDIA = 512,
                CONNECT_DEFERRED = 1024,
                CONNECT_COMMANDLINE = 2048,
                CONNECT_CMD_SAVECRED = 4096,
                CONNECT_CRED_RESET = 8192,
                CONNECT_RESERVED = 4278190080
            }
            #endregion
        }
    }
    

    Note: This class actually is to map a drive, but authenticating to a share and authenticating to connect to remote registry are done the same way.

  3. Now here is a Program.cs that shows how to use the NetworkShare class to connect to a device and access the remote registry.
    using System;
    using Microsoft.Win32;
    using NetworkConnection;
    using System.Management;
    
    namespace RemoteRegistryExample
    {
        class Program
        {
            static void Main(string[] args)
            {
                String ServerName = "Server1";
    
                // Create an object that can authenticate to a network share when you
                // already have credentials
                NetworkShare share = new NetworkShare(ServerName, "ipc$");
    
                // Create an object that can authenticate to a network share when you
                // do NOT already have credentials
                //NetworkShare share = new NetworkShare(ServerName, "C$", "User", "SomePasswd");
    
                // Connect to the remote drive
                share.Connect();
    
                // Note: another connection option is to add a reference to System.Management,
                // Then add a using statement for System.Management and use ConnectionOptions
                // and ManagementScope objects. For more information see this link:
                // http://msdn.microsoft.com/en-us/library/system.management.managementscope%28v=VS.100%29.aspx
    
                // If these same credentials allow remote registry, you are now authenticated
                // Get the Windows ProductName from HKEY_LOCAL_MACHINE\SOFTWARE\Microsoft\Windows NT\CurrentVersion
                String ProductName = string.Empty;
                RegistryKey key = RegistryKey.OpenRemoteBaseKey(RegistryHive.LocalMachine, ServerName);
                if (key != null)
                {
                    key = key.OpenSubKey(@"SOFTWARE\Microsoft\Windows NT\CurrentVersion");
                    if (key != null)
                        ProductName = key.GetValue("ProductName").ToString();
                }
    
                // Display the value
                Console.WriteLine("The device " + ServerName + " is running " + ProductName + ".");
    
                // Disconnect the share
                share.Disconnect();
            }
        }
    }
    

    You now are reading from remote registry.

Loading rich text file links in a browser from a WPF Navigation Application

Previously, I discussed loading a rich text file in a regular WPF Application in this post:
Loading a RichTextBox from an RTF file using binding or a RichTextFile control

The following use cases must be met:

  1. Load and display a rich text file in read only mode
  2. The links must open inside a browser and not in the application

We created a RichTextFile control that inherits RichTextBox and configured it to support binding. Now we are going to use this same object in a WPF Navigation Application.

A WPF Navigation Application is going to react differently. Links are going work by default, so the Hyperlink.Click event doesn’t have to be used. However, there is a problem, the links open in the actual application’s window and not in a browser. Lets fix this.

Part 2 – Using the RichTextFile class in a WPF Navigation Application

Use Case 1 – Loading a rich text file

Create a new WPF Application in Visual Studio.

Add a Frame element and set the source to RTF.xaml, which we will create next.

<Window x:Class="RichTextFileTest.MainWindow"
        xmlns="http://schemas.microsoft.com/winfx/2006/xaml/presentation"
        xmlns:x="http://schemas.microsoft.com/winfx/2006/xaml"
        Title="MainWindow" Height="350" Width="525">
    <Grid>
        <Frame Source="RTF.xaml" />
    </Grid>
</Window>

There is no code behind for this, yet.

Create a new WPF Page called RTF.xaml.

Add the above RichTextFile object to the project.

Add an xmlns reference to our new object. Then add our new object. Notice in our new object that we set IsReadOnly=”True” but we also set IsDocumentEnabled=”True”. This allows for clicking a link even though the document is read only.

<Page x:Class="RichTextFileTest.RTF"
      xmlns="http://schemas.microsoft.com/winfx/2006/xaml/presentation"
      xmlns:x="http://schemas.microsoft.com/winfx/2006/xaml"
      xmlns:mc="http://schemas.openxmlformats.org/markup-compatibility/2006" 
      xmlns:d="http://schemas.microsoft.com/expression/blend/2008" 
      mc:Ignorable="d" 
      d:DesignHeight="300" d:DesignWidth="300"
      Title="RTF"
      xmlns:controls="clr-namespace:System.Windows.Controls">
    <Grid>
        <controls:RichTextFile File="{Binding File}" IsReadOnly="True" IsDocumentEnabled="True"/>
    </Grid>
</Page>

Code Behind

using System;
using System.Diagnostics;
using System.Windows;
using System.Windows.Controls;
using System.Windows.Documents;

namespace RichTextFileTest
{
    /// <summary>
    /// Interaction logic for RTF.xaml
    /// </summary>
    public partial class RTF : Page
    {
        public RTF()
        {
            InitializeComponent();
            Example example = new Example() { File = "File.rtf" };
            DataContext = example;
        }
    }

    public class Example
    {
        public String File { get; set; }
    }
}

Now the first use case is complete, the rich text file is loading into the RichTextFile control and is visible in the application. However, the second use case is incomplete, but not because the links aren’t loading, but because they are not loading in a browser. Instead they are loading inside the Frame element.

Use Case 2 – Getting the links to open in a browser

Getting the links to open in a browser is not straight forward and it took me quite some time to find an easy solution. Somehow, the link must be open in a browser and then the Navigation event must be canceled.

The easiest way to do this is to implement the Nagivating function on the Frame element in our MainWindow.

<Window x:Class="RichTextFileTest.MainWindow"
        xmlns="http://schemas.microsoft.com/winfx/2006/xaml/presentation"
        xmlns:x="http://schemas.microsoft.com/winfx/2006/xaml"
        Title="MainWindow" Height="350" Width="525">
    <Grid>
        <Frame Source="RTF.xaml" Navigating="Frame_Navigating"/>
    </Grid>
</Window>

Now implement the code behind for the Frame_Navigating method.

using System.Diagnostics;
using System.Windows;
using System.Windows.Controls;

namespace RichTextFileTest
{
    /// <summary> 
    /// Interaction logic for MainWindow.xaml
    /// </summary>
    public partial class MainWindow : Window
    {
        public MainWindow()
        {
            InitializeComponent();
        }

        private void Frame_Navigating(object sender, System.Windows.Navigation.NavigatingCancelEventArgs e)
        {
            Frame frame = sender as Frame;
            if (frame != null && frame.Source != null)
            {
                // See if we are hitting a link using HTTP or HTTPS
                if (frame.Source.ToString().StartsWith("http://", System.StringComparison.CurrentCultureIgnoreCase)
                    || frame.Source.ToString().StartsWith("https://", System.StringComparison.CurrentCultureIgnoreCase))
                {
                    // Open the URL in a browser
                    Process.Start(frame.Source.ToString());

                    // Cancel the Navigation event
                    e.Cancel = true;
                }
            }
        }
    }
}

The links should now be opening in your browser and not in your application.

Here is the sample project that demonstrates this.
RichTextFileNavigation.zip
Loading a RichTextBox from an RTF file using binding or a RichTextFile control

Sometimes you have a rich text document that exists as an actual file and you simply want to load the file and display it.

My exact use cases are these:

  1. Load and display a rich text file in read only mode
  2. The links must open inside a browser and not in the application

I like to use MVVM, so my goal is to use binding to pass in the file name. Unfortunately the RichTextBox class is not designed to bind to a file name. However, extending this control to have this functionality is quite easy.

RichTextFile extending RichTextBox

Here is my new class. I have extended RichTextBox with four additional items in a new derived class called RichTextFile.

  1. Added a String Property called File.
  2. Added a DependecyProperty called FileProperty
  3. Added a PropertyChangedCallback function called OnFileChanged
  4. Added a ReadFile function that reads a .rtf file into a FlowDocument

RichTextFile.cs

using System;
using System.IO;
using System.Windows;
using System.Windows.Controls;
using System.Windows.Documents;

namespace System.Windows.Controls
{
    class RichTextFile : RichTextBox
    {
        #region Properties
        public String File
        {
            get { return (String)GetValue(FileProperty); }
            set { SetValue(FileProperty, value); }
        }

        public static DependencyProperty FileProperty =
            DependencyProperty.Register("File", typeof(String), typeof(RichTextFile),
            new PropertyMetadata(new PropertyChangedCallback(OnFileChanged)));

        private static void OnFileChanged(DependencyObject d, DependencyPropertyChangedEventArgs e)
        {
            RichTextFile rtf = d as RichTextFile;
            if (d == null)
                return;

            ReadFile(rtf.File, rtf.Document);
        }
        #endregion

        #region Functions
        private static void ReadFile(string inFilename, FlowDocument inFlowDocument)
        {
            if (System.IO.File.Exists(inFilename))
            {
                TextRange range = new TextRange(inFlowDocument.ContentStart, inFlowDocument.ContentEnd);
                FileStream fStream = new FileStream(inFilename, FileMode.Open, FileAccess.Read, FileShare.Read);

                range.Load(fStream, DataFormats.Rtf);
                fStream.Close();
            }
        }
        #endregion
    }
}

You can use this new object to load a .rtf file quite easily. I am going to show you how I succeeding in my two use cases using both a regular WPF Application and a WPF Navigation Application.

Part 1 – Using the RichTextFile class in a WPF Application

Use Case 1 – Loading a rich text file

Create a new WPF Application in Visual Studio.

Add the above RichTextFile object to the project.

Add an xmlns reference to our new object. Then add our new object. Notice in our new object that we set IsReadOnly=”True” but we also set IsDocumentEnabled=”True”. This allows for clicking a link even though the document is read only.

<Window x:Class="RichTextFileTest.MainWindow"
        xmlns="http://schemas.microsoft.com/winfx/2006/xaml/presentation"
        xmlns:x="http://schemas.microsoft.com/winfx/2006/xaml"
        Title="MainWindow" Height="350" Width="525"
        xmlns:controls="clr-namespace:System.Windows.Controls">
    <Grid>
        <controls:RichTextFile File="{Binding File}" IsReadOnly="True" IsDocumentEnabled="True" />
    </Grid>
</Window>

Code Behind

using System;
using System.Diagnostics;
using System.Windows;
using System.Windows.Documents;

namespace RichTextFileTest
{
    /// <summary>
    /// Interaction logic for MainWindow.xaml
    /// </summary>
    public partial class MainWindow : Window
    {
        public MainWindow()
        {
            InitializeComponent();
            Example example = new Example() { File = "File.rtf" };
            DataContext = example;
        }
    }

    public class Example
    {
        public String File { get; set; }
    }
}

Now the first use case is complete, the rich text file is loading into the RichTextFile control and is visible in the application. However, the second use case is incomplete as clicking the link does nothing.

Use Case 2 – Getting the links to open in a browser

The links can easily made to open in a browser by implementing the Hyperlink.Click event on the RichTextFile. Here is how this is done.

<Window x:Class="RichTextFileTest.MainWindow"
        xmlns="http://schemas.microsoft.com/winfx/2006/xaml/presentation"
        xmlns:x="http://schemas.microsoft.com/winfx/2006/xaml"
        Title="MainWindow" Height="350" Width="525"
        xmlns:controls="clr-namespace:System.Windows.Controls">
    <Grid>
        <controls:RichTextFile File="{Binding File}" IsEnabled="True" IsReadOnly="True" IsDocumentEnabled="True" Hyperlink.Click="RichTextFile_Click"/>
    </Grid>
</Window>

Then define the event function in the code behind.

using System;
using System.Diagnostics;
using System.Windows;
using System.Windows.Documents;

namespace RichTextFileTest
{
    /// <summary>
    /// Interaction logic for MainWindow.xaml
    /// </summary>
    public partial class MainWindow : Window
    {
        public MainWindow()
        {
            InitializeComponent();
            Example example = new Example() { File = "File.rtf" };
            DataContext = example;
        }

        private void RichTextFile_Click(object sender, RoutedEventArgs e)
        {
            Hyperlink link = e.OriginalSource as Hyperlink;
            if (link != null)
            {
                Process.Start(link.NavigateUri.ToString());
            }
        }
    }

    public class Example
    {
        public String File { get; set; }
    }
}

The links should now be opening in your browser.

Here is the sample project that demonstrates this.
RichTextFileTest.zip

Part 2 – Using the RichTextFile class in a WPF Navigation Application

Some sample extension methods for the string class

Because String is a sealed class you cannot inherit from it and add to it. However, C# has a wonderful feature called extension methods.

Extension methods enable you to “add” methods to existing types without creating a new derived type, recompiling, or otherwise modifying the original type. Extension methods are a special kind of static method, but they are called as if they were instance methods on the extended type. For client code written in C# and Visual Basic, there is no apparent difference between calling an extension method and the methods that are actually defined in a type. [1]

Here is a list of extension methods I have used for the String class.

If you know of any more cool extension methods, please comment.

using System;
using System.Runtime.InteropServices;
using System.Text.RegularExpressions;
using System.Security;

namespace LANDesk.Install.Common.Extenders
{
    /// <summary>
    /// This class adds methods to String that are useful
    /// </summary>
    public static class StringExtender
    {
        #region DLL Imports
        [DllImport("ldmsinst.dll", CharSet = CharSet.Ansi, EntryPoint = "Decrypt", CallingConvention = CallingConvention.Cdecl)]
        public static extern void Decrypt(int pwdLen, byte[] pwd);

        [DllImport("ldmsinst.dll", CharSet = CharSet.Ansi, EntryPoint = "Encrypt", CallingConvention = CallingConvention.Cdecl)]
        public static extern void Encrypt(int length, byte[] data);
        #endregion

        /// <summary>
        /// This adds a function to a string object that will convert the string
        /// to a SecureString.
        /// </summary>
        /// <param name="password">The string to convert to a secure string.</param>
        /// <returns>SecureString</returns>
        public static SecureString ConvertToSecureString(this string password)
        {
            SecureString ss = new SecureString();
            if (password == null)
                throw new ArgumentNullException("password");

            foreach (Char c in password)
            {
                ss.AppendChar(c);
            }
            return ss;
        }

        /// <summary>
        /// Checks if the string contains any of a list of characters
        /// entered as a string.
        /// </summary>
        /// <param name="password">Any string.</param>
        /// <param name="listofcharacters">Any string representing a list of characters.</param>
        /// <returns>bool</returns>
        public static bool ContainsAnyOf(this string password, char[] listofcharacters)
        {
            foreach (char c in listofcharacters)
            {
                if (password.Contains(c.ToString()))
                    return true;
            }
            return false;
        }

        /// <summary>
        /// Checks if the string contains any of a list of characters
        /// entered as a string.
        /// </summary>
        /// <param name="password">Any string.</param>
        /// <param name="listofcharacters">Any string representing a list of characters.</param>
        /// <returns>bool</returns>
        public static bool ContainsAnyOf(this string password, string listofcharacters)
        {
            return password.ContainsAnyOf(listofcharacters.ToCharArray());
        }

        /// <summary>
        /// Checks if the string has a space.
        /// </summary>
        /// <param name="txt">Any string.</param>
        /// <returns>bool</returns>
        public static bool HasSpaces(string txt)
        {
            if (txt.Contains(" "))
            {
                return true;
            }
            return false;
        }

        /// <summary>
        /// To be a strong password, Must have 3 out of 4 of the following conditions:
        /// Uppercase, lowercase, numberic, symbol
        /// </summary>
        /// </summary>
        /// <param name="password"></param>
        /// <returns></returns>
        public static bool IsPasswordStrong(this string password)
        {
            int numTypes = 0;

            if (HasUppercaseCharacter(password) == true)
            {
                numTypes = numTypes + 1;
            }
            if (HasLowercaseCharacter(password) == true)
            {
                numTypes = numTypes + 1;
            }
            if (HasNonAlphaNumeric(password) == true)
            {
                numTypes = numTypes + 1;
            }
            if (HasDigit(password) == true)
            {
                numTypes = numTypes + 1;
            }

            if (numTypes > 2)
            {
                return true;
            }
            else
            {
                return false;
            }
        }

        public static bool HasUppercaseCharacter(string str)
        {
            if (str == str.ToLower())
                return false;
            return true;
        }

        public static bool HasLowercaseCharacter(string str)
        {
            if (str == str.ToUpper())
                return false;
            return true;
        }

        public static bool HasDigit(string str)
        {
            Regex regexNums = new Regex("[0-9]");
            return regexNums.IsMatch(str);
        }

        public static bool HasNonAlphaNumeric(string str)
        {
            string newString = str;

            Regex regexNums = new Regex("[0-9]");
            Regex regexAlphas = new Regex("[a-z]", RegexOptions.IgnoreCase);

            newString = regexNums.Replace(newString, "");
            newString = regexAlphas.Replace(newString, "");

            return (newString.Length > 0);
        }

        /// <summary>
        /// This adds a function to a string object that RC4 Encrypts a password.
        /// </summary>
        /// <param name="password">A password as a string.</param>
        /// <returns>A byte[] representation of an RC4 password.</returns>
        public static byte[] Encrypt(this string password)
        {
            try
            {
                // Encode the password
                System.Text.ASCIIEncoding encoding = new System.Text.ASCIIEncoding();
                byte[] encryptedPwd = encoding.GetBytes(password);

                // encrypt password
                Encrypt(encryptedPwd.Length, encryptedPwd);
                return encryptedPwd;
            }
            catch (Exception ex)
            {
                throw ex;
            }
        }

        /// <summary>
        /// This adds a function to a byte[] object that decrypts an RC4 password.
        /// and returns the password as a string.
        /// </summary>
        /// <param name="encryptedPwd">A byte[] representation of an RC4 password.</param>
        /// <returns>The password as a string.</returns>
        static public string Decrypt(this byte[] encryptedPwd)
        {
            string password = string.Empty;
            try
            {
                    // decrypt password
                    Decrypt(encryptedPwd.Length, encryptedPwd);

                    // convert from byte array to string
                    password = System.Text.ASCIIEncoding.Default.GetString(encryptedPwd);
                    password = password.Replace("\0", string.Empty);
            }
            catch (Exception ex)
            {
                throw ex;
            }
            return password;
        }

        public static string FirstLetterUpperCase(this string inString)
        {
            if (string.IsNullOrEmpty(inString))
                return string.Empty;

            string newString = inString.Substring(0, 1).ToUpper();
            newString += inString.Substring(1, inString.Length - 1);
            return newString;
        }

        public static string LimitTo(this string data, int length)
        {
            return data.Length < length ? data : data.Substring(0, length);
        }
    }
}